How to schedule Reels on Instagram in 3 ways

Table of Contents
Instagram Reels get some of the best engagement on the platform. These short-form vertical videos generate more impressions and comments than any other format. For small businesses, Reels are the fastest way to grow on Instagram.
But if you’re manually posting each Reel, especially multiple times a day, you’re doing more harm than good. Your team will end up spending hours each week on a repetitive task that can easily be automated with a social media scheduling tool.
Scheduling Instagram Reels in advance helps you post consistently, hit peak engagement times and focus on creating better content. It’s also a great way to keep the algorithm happy and rake up those views, likes, comments and shares.
In this post, we’ll show you 3 ways to schedule Instagram Reels.
Can you schedule Instagram Reels?
Yes! You can schedule Instagram Reels in three different ways:
- Natively using the Instagram app
- Using social media scheduling tools (e.g., Sprout Social)
- Using Meta Business Suite
We’ll show you how to schedule your Reels with each method below.
Note: Scheduling Instagram posts and Reels is only available for Instagram Business or Creator accounts (not personal accounts), so make sure you check your account type before diving in. Learn how to switch to a professional account here.
How to schedule Instagram Reels from the Instagram app
Third-party scheduling tools for Instagram have been around for a while, but the app itself did not support native scheduling until the end of 2022. Users can now schedule up to 25 posts daily and up to 75 days in advance directly through the Instagram app only. Scheduling is only available through the native app and not through desktop login.
Keep in mind, only Instagram Business and Creator accounts have access to this feature. Personal profiles are unable to schedule content.
If you’re looking for information about Instagram trial Reels, we have a whole guide for you.
Otherwise, follow these steps to get started scheduling Reels.
Step 1. Create a new Reel
Open your Instagram app and tap the + at the bottom of the screen or swipe right on your home feed to create a new Reel.
Select Reel from the content types at the bottom.

Step 2. Film or upload your video
Either shoot clips directly using the in-app camera, or upload videos from your phone.
Step 3. Edit and finalize your Reel
Add text, stickers, music, effects, etc., then add your caption.

Step 4. Schedule your Reel
Tap More options at the bottom of the screen.

Toggle the Schedule this reel option on, then select your preferred date and time from the menu that appears.

Go back to the previous screen and tap Schedule.
While Instagram’s native scheduling is straightforward, it has some limitations. For example, you can’t cross-post to other accounts. So if you need to share content across multiple platforms, check out methods two or three for scheduling Reels.
Using a third-party scheduling tool also gives you access to more in-depth analytics to track the performance of your Reels. We’ll talk more about that later.
How to schedule Instagram Reels with Sprout Social via desktop
Scheduling Reels through Instagram’s native app works fine for some businesses. But if you’re a business dealing with a larger social strategy, you’ll need a tool that lets you easily schedule and manage content across multiple platforms.
Sprout Social is one of those tools that let you do more than just schedule Reels. You can cross-post on other networks, collaborate with your team, engage with your audience and track in-depth analytics—all in one place.
Here’s how to schedule Instagram Reels with Sprout on your desktop.
Step 1: Sign up and connect your Instagram profile
Before you can schedule your Reels via Sprout Social, you need to connect your Instagram profile(s). Log in to your Sprout dashboard or sign up for a free 30-day trial here.
Click Connect a Profile and choose Instagram from the various options. Then, follow the on-screen guidelines to link your Instagram profile to your Sprout account.
Note: Link all your Instagram profiles to Sprout to schedule Reels to multiple accounts. You can also connect your other social profiles, including Facebook, LinkedIn and Twitter (X).
Step 2: Compose your Instagram Reel
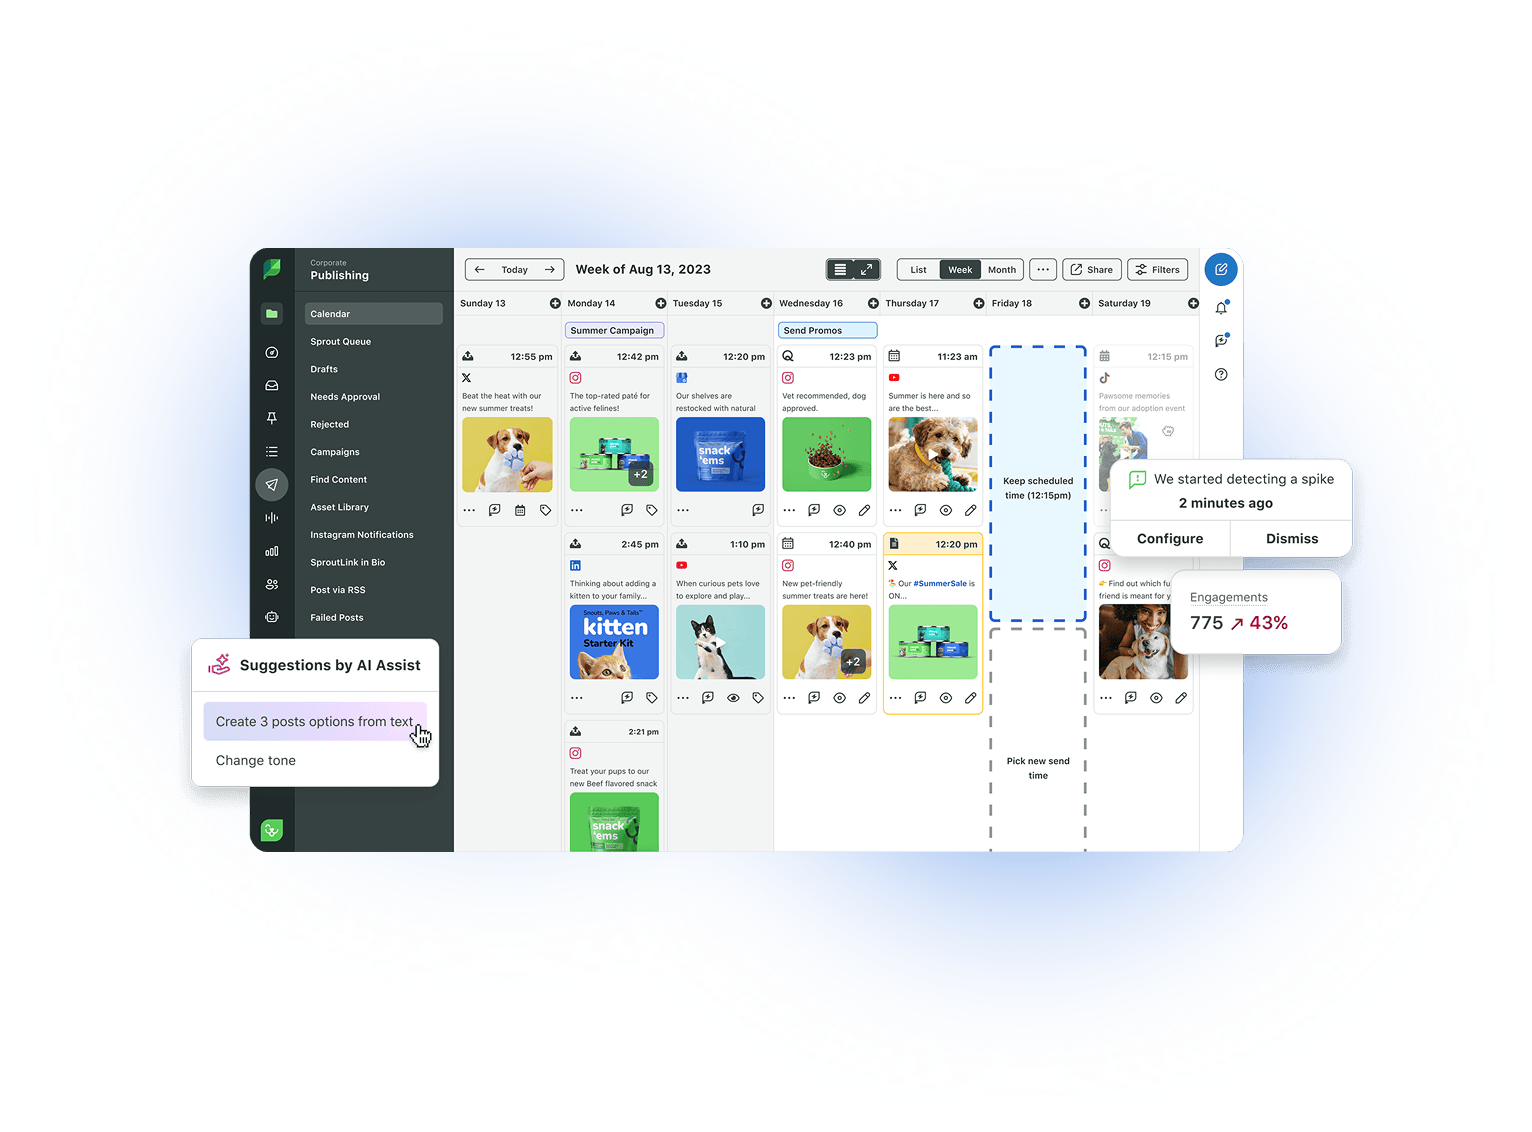
Once you’ve connected your profile, click Publishing on the left to open Sprout’s social media calendar. You can switch between list, week or monthly calendar views.
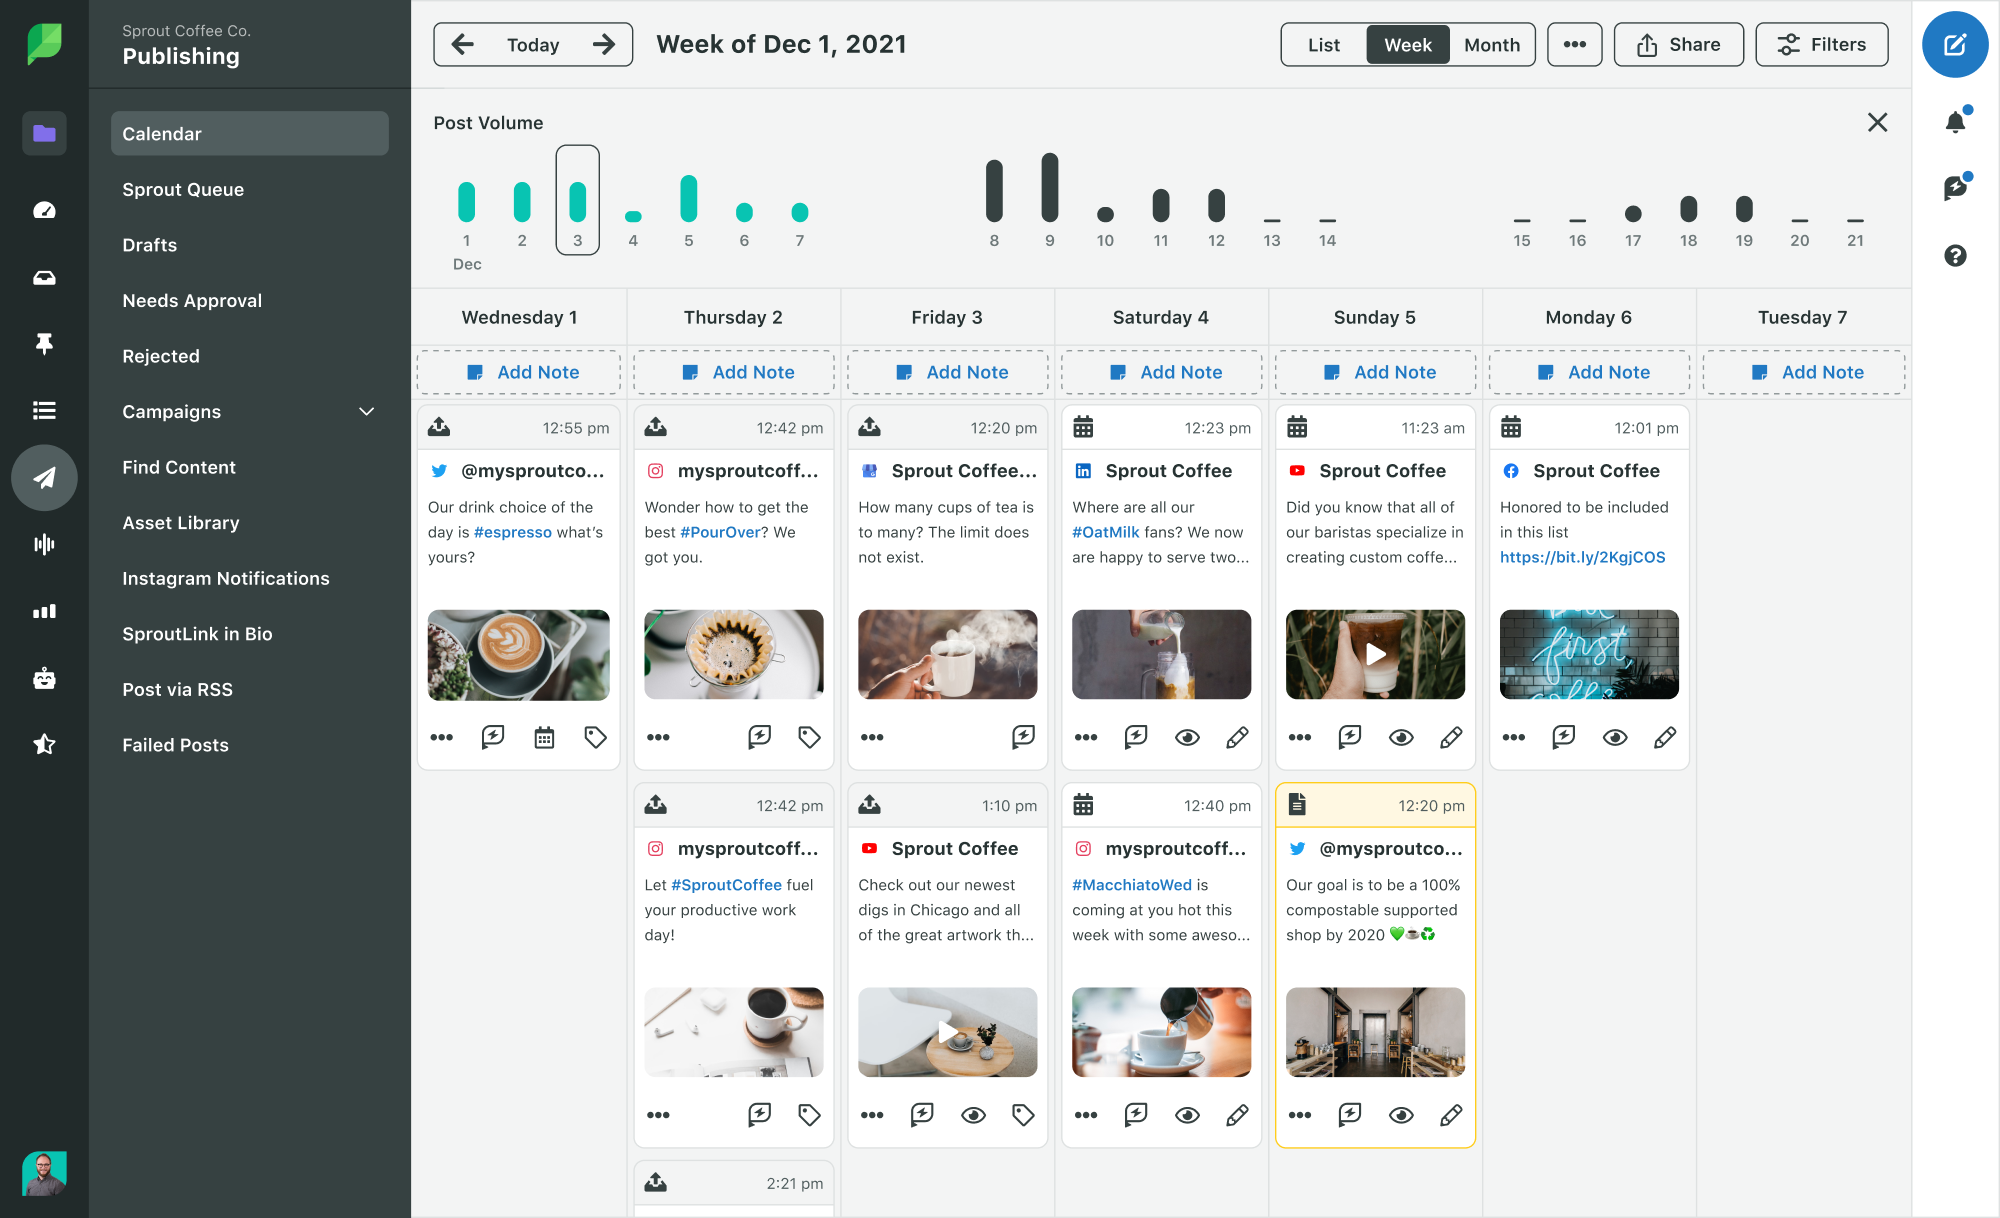
Hover on your calendar to schedule a Reel on a specific day. There’s also an option to leave notes (e.g., Reel ideas you want to share with the team).
You can also skip the calendar view and click the blue pencil/paper icon in the top right corner from any screen to create a new Reel.
Select the Instagram profile you want to publish to from the drop down menu.
Now, you can start composing your Reel. If you’re looking for inspiration, here are some Instagram Reel ideas to get your creative juices flowing.
Add your Reel video
Start by uploading your media. There are several ways to do this in Sprout:
- Upload your Reel video directly from your computer
- Import from Bynder, Dropbox or Google Drive
- Add a video from your asset library in Sprout

Once you’ve uploaded your video, you can change the thumbnail frame by clicking on the pencil icon that appears when you hover on the attached media. You can also upload a different image to use as your thumbnail.
This is also where you can toggle the option to share your Reel to your profile feed or have it appear only in the Reels tab.
Write your caption
Next, write an engaging caption for your Reel. You can also add relevant Instagram hashtags, or tag users and other brands in your caption (e.g. during a partnership).
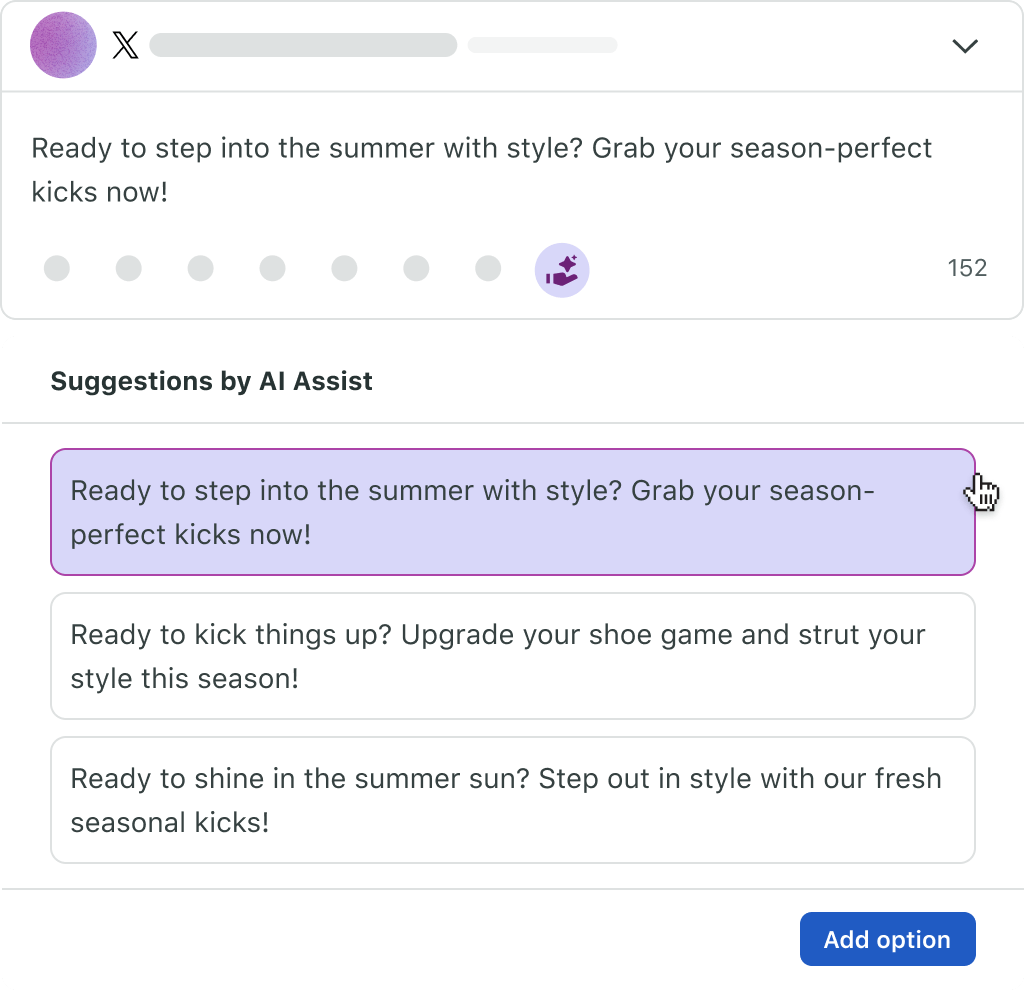
Sprout pro tip: Use our Enhance by AI Assist feature to generate more caption ideas and speed up your creative process. If you’re not sure what to post about, Enhance by AI Assist can help you create content based on a draft you input into the Compose box. If you’re looking to change the tone of the content (think: confident, friendly or professional), try Suggestions by AI Assist to align captions with your brand’s tone of voice.
Set a Mobile Publisher (optional)
If you want to use audio from Instagram’s sound library in your Reel content, you’ll need to choose a Mobile Publisher. This person will post your Reel from Instagram’s mobile app and will get a reminder (push notification) from Sprout’s mobile app on their device when it’s time to do so.
Step 3: Schedule your Reel
Scroll down to When to post and select your preferred date and time. This is when your scheduled Reel will go live. You can also adjust the time zone if your audience is located in a different country or region.
If you’re not sure when to post your Reel, select Optimal Send Times to see data-driven recommendations when your audience is most likely to see your content. Sprout’s ViralPost™ technology suggests the best times to post based on your historical engagement data to help you maximize your Reel’s impact.
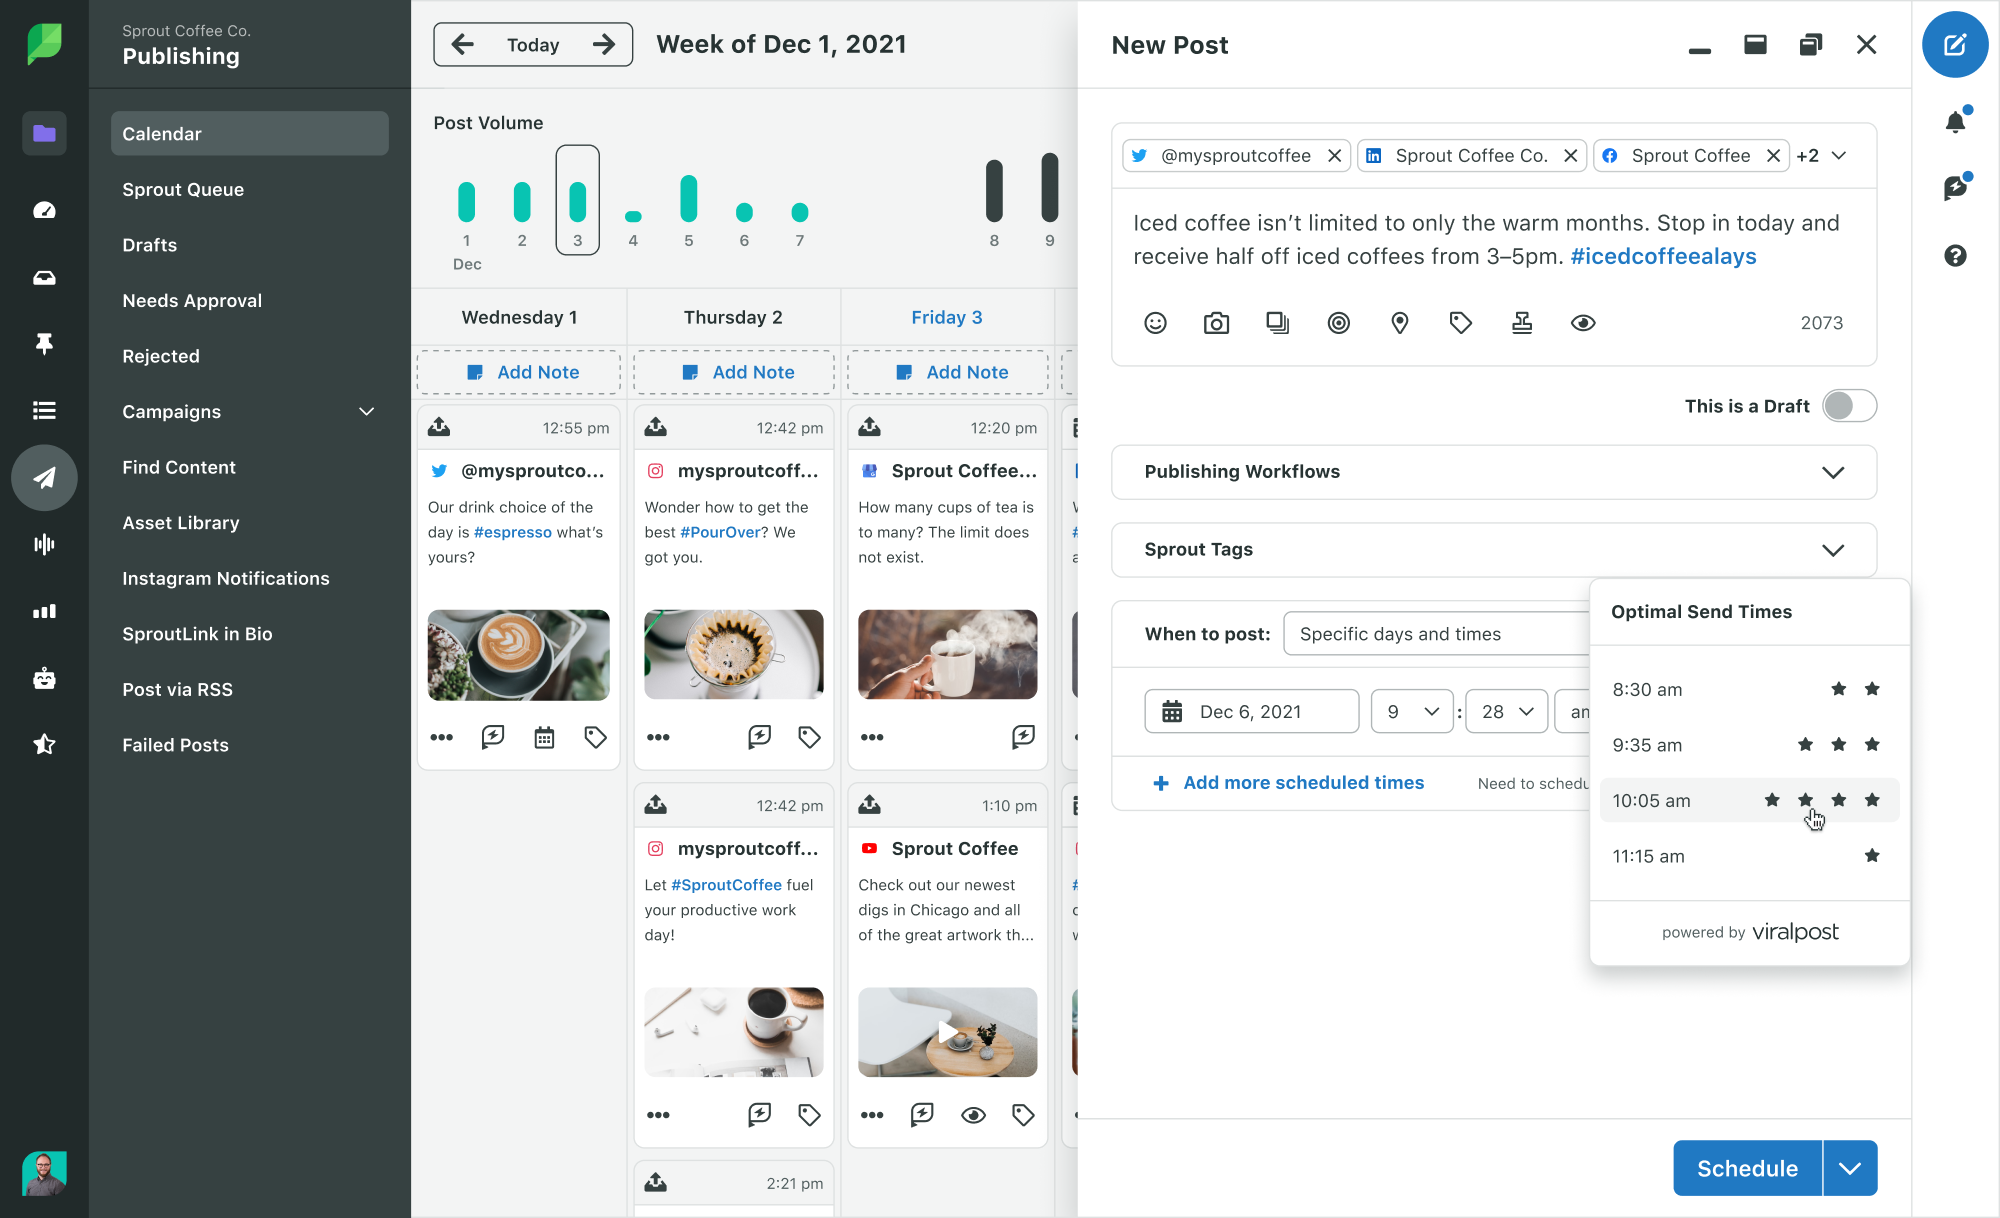
After finalizing the date and time, click Submit or Schedule to add it to your calendar.
How to schedule Instagram Reels with Sprout Social via iOS app
Scheduling Instagram Reels using Sprout’s iOS app is similar to doing the same on desktop, with some minor differences. You can easily schedule videos on the go from your phone.
Follow the steps below to schedule Instagram Reels using Sprout’s iOS app.
- Step 1: Tap the Compose box and select your Instagram profile.
- Step 2: Upload your Reel video from your iOS device or Asset Library to the Compose box.
- Step 3: Write a caption, add your hashtags and insert any mentions or tags.
- Step 4: Tap Done and add Mobile Publisher Notes.
- Step 5: Tap Notify and then choose a publishing date and time for your Reel.
- Step 6: Tap Save. Your Reel is now scheduled and will appear on the publishing calendar.

How to schedule Instagram Reels from Meta Business Suite
You can also schedule Instagram Reels using the Meta Business Suite.
First, connect your Instagram account to your Facebook page so you can access both from the Meta Business Suite. Then follow the steps below to schedule your Reel.
Step 1. Create a new Reel
Log in to the Meta Business Suite, and click Create reel.
Step 2. Add media and caption
Upload one or more videos for your Reel content.

This is also where you can write a compelling caption to go with your video. Include any relevant hashtags, location tags or mentions.
Step 3. Edit your Reel
You can make basic edits to your Reel before you publish or schedule it.

Crop your video, add trending sounds from the built-in library, insert text and even enhance the original audio. There’s a timeline editor at the bottom to make editing and syncing audio easier.
Step 4. Schedule your Reel
Hit Next and select a date and time to schedule your Instagram Reel.

You can also add a poll and adjust privacy settings (Public or Restricted) at this step.
When you’re done, click Schedule. Your Reel is now ready to go live at your chosen time.
Why should you schedule Instagram Reels?
If you’re like most marketing teams, you’ve figured out that Reels are your ticket to growing on Instagram. But if you’re posting your videos manually throughout the day, you’re doing it the hard way.
Here’s why scheduling your Reels in advance might be the best thing you do for your Instagram strategy.
Maintain a consistent presence
Scheduling Instagram Reels ahead of time helps you consistently post fresh content, which keeps your audience engaged and your brand top-of-mind.
It also signals to your followers that you’re active and invested in connecting with them. Without consistency, even the best content can get lost in the noise, and your audience may drift away.
Sprout’s scheduling tools make it easy to maintain a regular posting cadence. You can plan your publishing calendar well in advance and make sure you’re not just posting Reels but also mixing in other content types like image posts, Carousels and Stories.
Maximize reach and engagement
Reaching your audience when they’re online is key to getting your Reels noticed. Instagram’s algorithm rewards content posted at the right time with more visibility and engagement.
But figuring out the best times to post isn’t always easy, especially when your audience is active in different time zones.
That’s where Sprout’s ViralPost™ feature can help. It analyzes your audience’s activity and recommends the best times to post for max engagement. Instead of guessing, you can rely on data to schedule your Reels for when they’re most likely to make an impact.
Save time and improve efficiency
Posting Reels manually every day can take time away from other important things like strategy building or content creation. Scheduling lets you batch your work, which frees up time to focus on those big-picture tasks that truly matter.
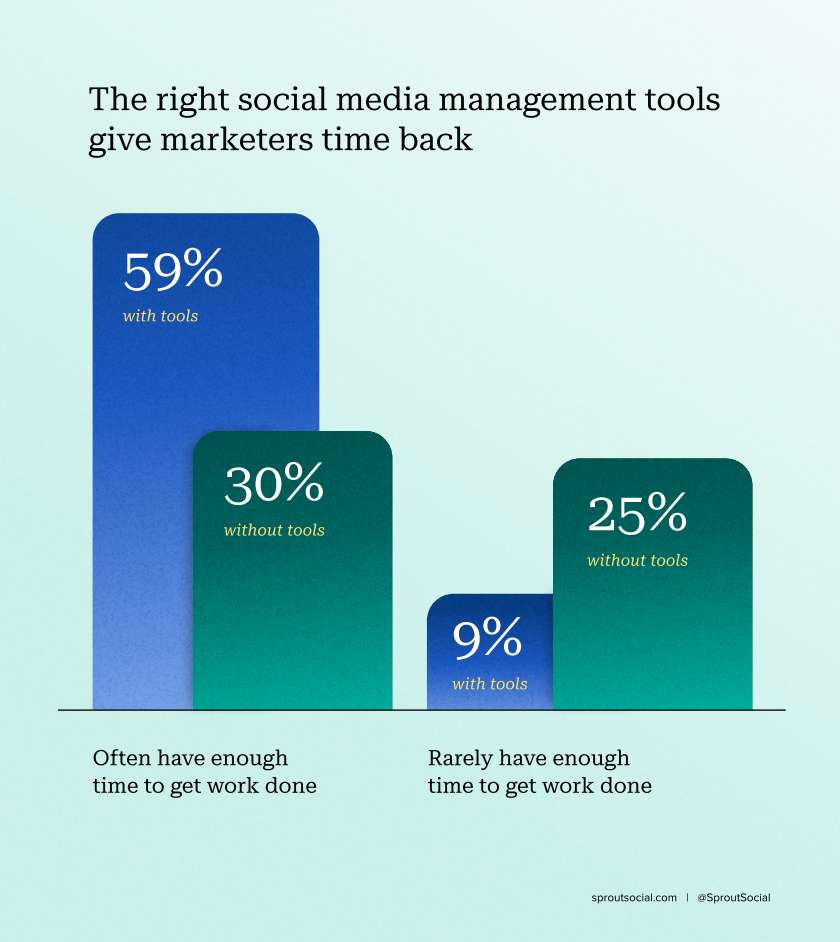
Need proof? Our Social Media Productivity Report revealed 63% of marketers feel that manual tasks hold them back from doing high-impact work. With the right social media management tools, however, 59% find they have more time to finish their tasks.
With Sprout’s publishing tools, you can upload and schedule Reels in bulk, plan weeks ahead and eliminate the stress of daily posting. With everything organized in one platform, you’ll have more time to think creatively and engage meaningfully with your audience.
Improve content quality
Creating great Reels isn’t just about hitting “post”—it’s about planning, editing and crafting content that truly resonates with your audience.
When you schedule your Reels in advance, you have more time to research customer needs and preferences, brainstorm content ideas, refine your visuals, write thoughtful captions and pick the best hashtags to boost visibility.
Combine that with Sprout’s AI Assist to get caption suggestions and help with drafting posts. Our smart writing tools make sure every Reel you share is polished and high-quality.
Streamline your workflow
Managing social media content can get overwhelming, especially when you’re juggling multiple platforms or working with a team. Scheduling keeps you organized and prevents last-minute issues like mistakes, typos or missed deadlines.
Sprout Social simplifies this further with a centralized workflow for drafting, approving and scheduling Instagram Reels and other posts. Team members can collaborate on, review and approve social content, making sure it’s aligned with your brand before it goes live.
Make data-driven optimizations
Understanding how your Reels perform is crucial for improving your strategy. Metrics like reach, views and engagement rates reveal what’s working and where there’s room to grow. Without these insights, you’re just guessing what your audience wants.
Sprout Social’s powerful Instagram analytics let you track your Reels’ performance in real-time. With granular data on your audience as well as individual posts, you can adjust your content, target the right audience and improve ROI in the long run.

Start scheduling Reels today
Let’s be real: manually posting Reels throughout the day is probably not the best use of your time. Sure, Reels are crushing it on Instagram right now—but spending hours on publishing means less time actually creating great content.
Good news? Scheduling changes everything. You’ll keep a consistent posting rhythm and free up time to focus on growing your brand on Instagram. No more dropping everything to post a Reel right this second.
Using a tool like Sprout makes this even easier, giving you everything you need to manage, schedule and optimize your Reels in one place. Sign up for a 30-day free trial now and see the difference scheduling makes.

Share