December 8, 2015
Designate Specific Users to Create and Manage Tags for Your Team
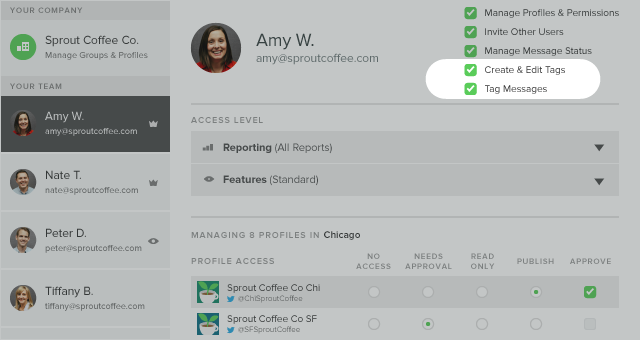
Easily govern the creation and overall management of tags with the new Create & Edit Tags permission which allows users to create new tags as well as edit, delete, archive, and unarchive existing tags.
- How To:
- Go to Settings > Users & Social Profiles.
- Select a member of your team from the Your Team menu on the left.
- Check the box next to Create & Edit Tags.
Create New Tags & Manage All Existing Tags
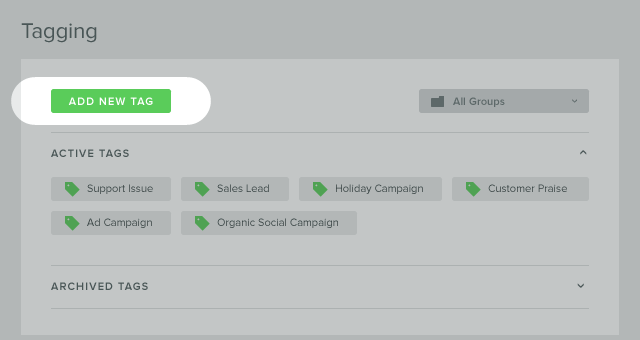
Any user with the Create & Edits Tags permission can easily create new tags as well as manage all existing tags. New tags can be created on the fly from Compose or from a message in the Smart Inbox. Editing, deleting and all other tag management takes places in the new Tagging screen under Settings.
- How To Add a New Tag:
- Visit Settings > Tagging.
- To add a new tag, click Add New Tag.
- Type the Tag Name and select the Groups to which you want the tag to be visible.
- Click Save.
- Compose your message.
- How To Create a New Tag from Compose or Smart Inbox*:
- From Compose or from a message in the Smart Inbox, click on the tag icon to open the tag menu.
- Start typing your tag name into the search field.
- Click Create Tag in the tag menu.
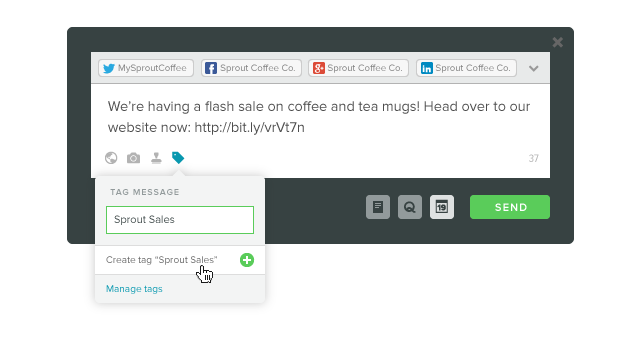
*Note: Only users with the Create & Edit Tags permission can create new tags from Compose or the Smart Inbox. Tags that are created in this manner will, by default, only be available in the Group from which it was created. Visit Settings > Tagging to edit the Group availability of any tags.
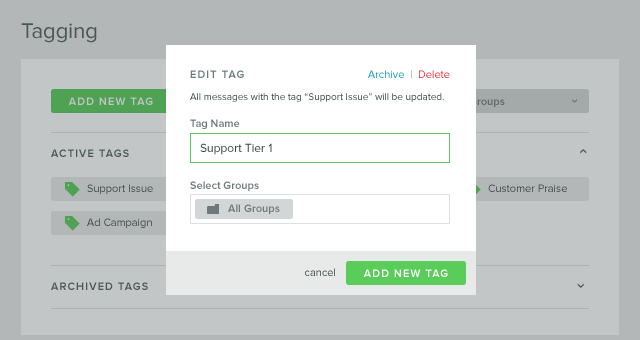
- How To Manage Existing Tags:
- Visit Settings > Tagging.
- Choose the tag you’d like to edit or delete from the Active Tags section.
- To edit the tag, make changes to the Tag Name or Groups and click Save.
- Or, choose Archive or Delete and confirm.
Streamline Your Tagging Workflow By Archiving Tags
Archiving tags that are no longer pertinent—like after a seasonal marketing campaign—can help your team to streamline your current tagging workflow without sacrificing historical data or tag attribution. Archiving will make a tag temporarily inactive. It will continue to appear on messages to which it was previously applied, but will no longer appear in filters and cannot be applied to messages while archived.
- How To:
- Visit Settings > Tagging.
- Click on the tag you wish to archive to open the Edit Tag screen.
- From the Edit Tag screen, click the Archive link in the top right corner.
- Click Archive Tag from the confirmation screen.
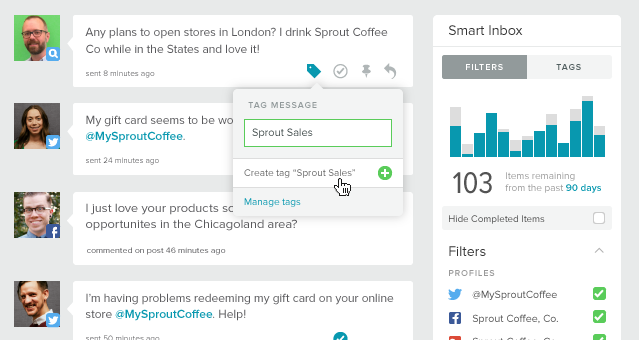
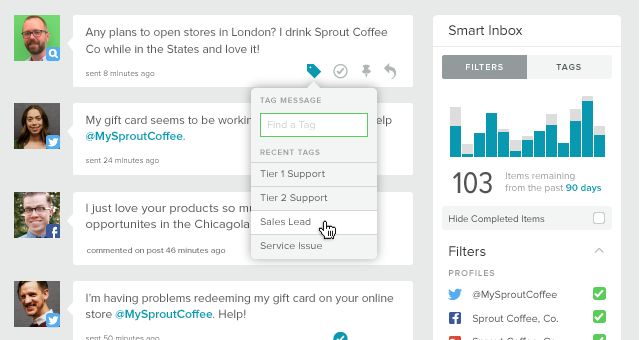
Apply Tags to Messages in the Smart Inbox
Sprout users can categorize messages by applying pre-existing or creating new tags from the Smart Inbox. Users can seamlessly collaborate within one inbox to ensure messages are tagged and responded to by the appropriate person.
- How To:
- From the Smart Inbox, select the message you would like to tag.
- Click the tag icon.
- Choose a tag from the tag menu list.
- The tag icon turns blue once the tag has been applied.
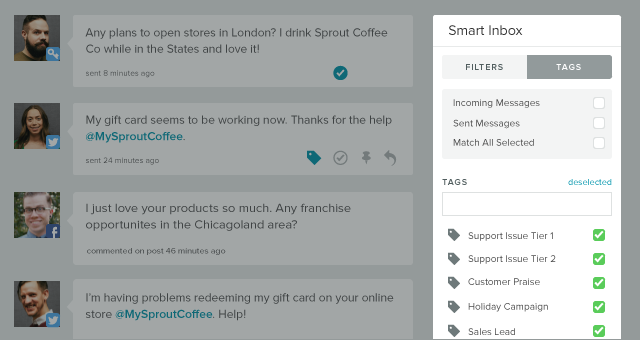
Filter the Smart Inbox by Message Tag
The new Tags view in the right bar of the Smart Inbox can be leveraged to perform powerful message filtering based on one or multiple tags.
- How To:
- From the top of the Smart Inbox right bar, toggle to Tags.
- Select the tag(s) to view corresponding messages.
- Use the Incoming and/or Sent Messages check boxes to refine filtering to focus on inbound and/or outbound strategies, respectively.
- Checking the Match All Selected box will implement “AND” logic – returning messages that include all of the selected tags*.
- Leaving the Match All Selected box unchecked will implement “OR” logic – returning messages that include any of the selected tags.
*Note: When using the Match All Selected filter, only three tags can be chosen from the tag list.
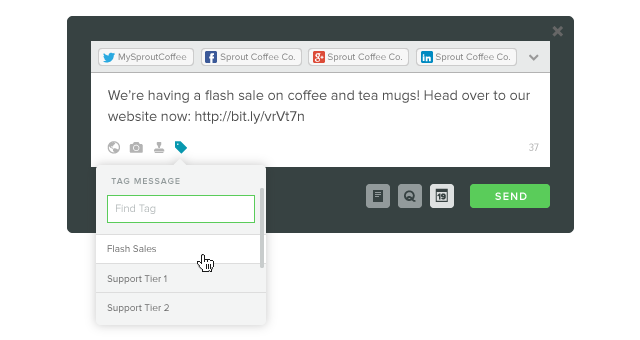
Apply Tags to Outgoing Messages from Compose
Now you can apply a custom tag to any outbound social message from Compose. Tagging outgoing content is a great way to organize and track marketing campaigns, content types or publishing strategies.
- How To:
- From Compose, click on the tag icon to open the tag menu.
- Choose a tag from the tag menu.
- Finish composing your message and click Send, Schedule, Queue or Submit for Approval.
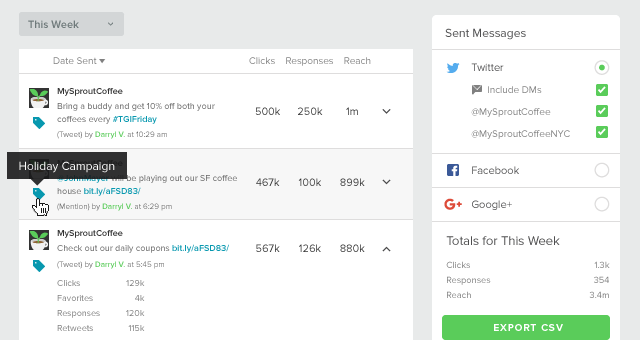
Analyze Sent Messages by Tag Using the Sent Messages Report
The new tag detail in the Sent Messages report will help you track publishing goals and audience engagement. Tags can be viewed on individual posts with the in-app report, or users can download data in CSV for deeper analysis.
- How To:
- From the Reports tab, click Sent Messages.
- View tag details by hovering over the tag icon on any message.
- Use the Export CSV option to sort, filter and aggregate metrics on published posts based on tags.
Share