How to Create a Bounce Animation for Android

Written by John O'Leary
Published on September 29, 2016
Reading time 2 minutes

Here at Sprout Social, our customers depend on us to help them reliably manage their social media content. Sprout customers use our mobile iOS and Android applications so they can manage their social media on the go. When we decided to update our Android message Compose experience to support publishing multiple images attached to a Tweet, we wanted to make it clear to the user when multiple images were attached, even when not visible on the Compose screen.
Design Solution: Use Animation to Denote Off-screen Images
Given our design and the constraints of a mobile screen, it was possible for attached images to reside off-screen. While this is not ideal, it was a necessary concession given the density of supported functionality on the Compose screen. For instances where images are, in fact, off-screen, we decided to implement a horizontal “bounce” animation that would indicate that the list of images was scrollable.
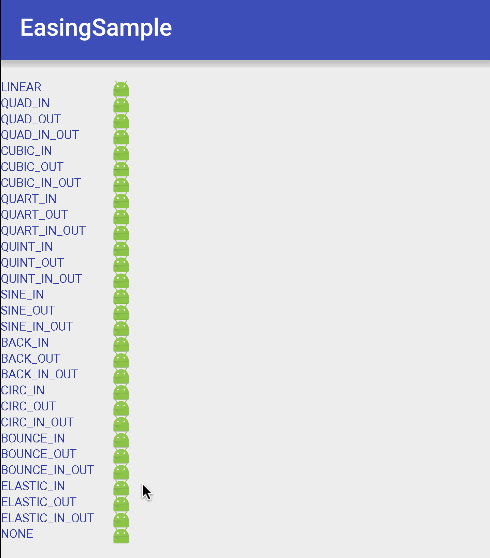
Implementation Choice: ObjectAnimator + EasingInterpolator
There are many mechanisms to support basic animations in Android. Some require configuration in code, others in xml. In picking from alternatives, we decided to prioritize backwards compatibility (we support sdk version 15+), simplicity of implementation and configurability. Ultimately, we decided to use a combination of ObjectAnimator and EasingInterpolator. Both of these can be configured in Java code, which ultimately is more developer-friendly: The syntax is familiar, and the animation logic can be completely defined in one location in the codebase.
ObjectAnimator is a class provided by the Android framework that allows for the modification of a Property of a View. Because the movement of the default interpolator for ObjectAnimator didn’t feel natural for our use case, we decided to use EasingInterpolator, which is a handy library that provides many different interpolation models.
Bounce Animation Code
private void doBounceAnimation(View targetView) {
        ObjectAnimator animator = ObjectAnimator.ofFloat(targetView, "translationX", 0, 25, 0);
        animator.setInterpolator(new EasingInterpolator(Ease.ELASTIC_IN_OUT));
        animator.setStartDelay(500);
        animator.setDuration(1500);
        animator.start();
}
Luckily, the code to handle this behavior is very concise. In Line 1, we are specifying how we want to animate the targetView. In this case, we want to modify the “translationX” Property of the targetView, which is the x-position of the view after layout. We want to animate from an offset of 0dp from the initial position to an offset of 25dp to the right and ultimately come back to the original offset of 0dp.
In Line 2, we are specifying the type of interpolation we would like. We played around with different interpolation models, but ultimately decided Ease.ELASTIC_IN_OUT looked best for our use case.
For more information on supporting Property animation in Android, check out the Property Animation developer doc.
Animation in Action
We’re really happy about our updates to the mobile Compose experience. Moving forward, we plan to continue enriching our mobile experience with responsive visual interfaces. Interested in working on this kind of stuff with us? Come work with us on our Android mobile team!
37 free social media strategy templates that will elevate your workflows
Published on May 13, 2025 Reading time 14 minutes
Share