How to take good Instagram photos: 5 tips to try now


Written by Jenn Chen
Published on September 4, 2019
Reading time 6 minutes


When Instagram first began in 2010, smartphone cameras were still lacking in features and quality. Instagram photos were taken with the in-app camera and on today’s screens, those old posts look blurry and pixelated. Now, the feed is a mix of smartphone photos and professionally processed photos. The smartphone camera is good enough now that it’s possible to use it on the fly and some won’t even know the difference.
If you’re looking to learn how to take Instagram photos or improve your Instagram photography skills, then this article is for you. Small businesses are not always able to hire a professional photographer so the next best thing is to understand some basic photography principles and learn what actually drives engagement on Instagram.
Instagram photo tips
This is a general guide to taking good photos for Instagram with your smartphone. If you’re looking to expand your photographic skill set even further after mastering these tips, check out phone model-specific guides or in-depth photo skills work through course platforms like Lynda, Coursera and Skillshare host classes. There are also plenty of lists where free photography lessons are compiled.
1. Understand light
Light is one of the biggest photography factors. Too much light and your subject looks washed out. Too little and the dark photo doesn’t grab your audience’s attention. When you’re doing brand photography, you want to understand how light affects the location you usually shoot in.
For example, if you’re in a restaurant, note when and where the sun comes in.
- Are certain windows more favorable than others?
- Does the afternoon sun make everything too bright?
- Where are the artificial lights and do they cast unfavorable spotlights on a table?
Early morning and sunset sun usually tend to cast the softest glow. An afternoon sun’s harsh rays often blow out a photo’s white parts. If you know how the sun and lights behave in your space, then it’ll be easier to plan the photo shoot.
In this example, the photographer uses the sheer curtains to diffuse the incoming light. The result is a well-lit photograph with no harsh sun.
For smartphones, it pays to be patient with your camera. Take a few minutes to tap on different focus areas to see how light and shadows change. Use the slider to adjust the brightness.
Tip: Take a photo of the same subject, angle and scene throughout the day so you become familiar with the lighting that’s available to you. It may be that you’ll need to have food ready to photograph hours before any foodservice because that’s when the best light is. Be creative with simple hacks to solve typical photography problems: if you need to highlight some shadows, use a white poster board to bounce the light.
2. Add layers to create interest
While a simple, minimalistic look is always en vogue, switch up your photos by adding layers. This means mixing in different textures and having a foreground and/or background. You’ll still have a subject in focus but layers add interest and guide the viewer to your subject.
In the above example, an empty glass was used on the right side to blur some of the image. Your eye moves instinctually to the left to focus on the coffee and then to the right to the vase’s elements.
Some smartphones have portrait mode available to you so you can easily create some depth in your photos. If you have complicated backgrounds, it may be better to focus on your subject and blur the background.
In this example, the ice cream and cone are in center focus while the person behind is blurred. There is just enough of an in-focus and blur contrast for you to understand everything that is going on in the photo at a first glance.
Tip: Instead of a straight-on shot, add a leaf on the side of your lens or duck behind a larger structure. Taking photos through a window so some reflections are in the foreground can also be fun. You’ll need to tap on your phone screen to change the different focal points, so try it out and experiment with how it affects your resulting pictures.
3. Use continuous burst for action shots
When you’re at an event and you need to snag some photos, don’t just take one or two. In event photography, you want a high amount of photos to choose from. Why? You’re always bound to catch someone in a mid-talking expression, eyes at half-mast or some strange combo of the two.
To combat this, set up your shot with the desired composition and light, then utilize continuous burst mode to capture multiple images in a short amount of time. You can sort through them later to find the best one.
Here, multiple shots were taken in a row for various stages of pouring the latte. This way, you don’t have to worry about having only one chance to get the perfect shot, you can review later to find which one is the best photo out of the set.
Tip: Don’t get discouraged by how many action shots you’ll need to take before finding the perfect one. Even the most seasoned pro event photographer may deliver only 10% of the shots that were taken.
4. Utilize rule of thirds & white space
In photography principles, the rule of thirds is a composition guide. Divide up your frame in three evenly spaced vertical lines and three evenly-spaced horizontal lines. You’ll end up with nine-part grid. Where the lines intersect are where subjects in focus can be placed. This is an alternative to the perfectly centered shot.
The above photo has the subject (croissants) lying right on top of the lower right intersection.
For some photos, you may really want to isolate your subject. In that case, using the rule of thirds in combination with white space would create a powerful result.
Tip: Your phone’s camera may have these gridlines available for you while you’re taking the shot. Having these overlaid will help you place your subject at the gridlines.
5. Mix up your angles
We previously mentioned the gridlines before, which help you line up your shots. These are also useful for creating angles.
For the perfect overhead shot or interior shot, match the gridlines up so that your photo elements are parallel. What does this mean? The tables or walls should be parallel in your photo to the camera’s gridlines.
The shot above lines the edges of the cup so that they’re perfectly vertical. This gives the viewer a nice sight line straight to the subject.
And now that we suggested lining up, don’t be afraid to mix it up! Before taking the shot, step back and examine it from various angles. Sometimes the straight-on shot isn’t the most interesting. If you’re going to try a new angle, make sure you make it deliberately not parallel to the gridlines. Having it only slightly off will only be bothersome.
For this photo, Fenty took a top angle approach to include the different colors. If it was taken from the side, some of the product would’ve been hidden. If it was taken from the top, we wouldn’t be able to see what the packaging looks like.
Tip: Some smartphone cameras have a middle crosshair that appears when you’re taking an overhead shot. Use this to guarantee a perfectly lined up shot from above.
Analyze your Instagram photos that get the most likes
Before you go off snapping photos on your phone for your brand, sit back down for some analytics. It won’t do you any good to put time into taking good photos if you don’t know what photos your audience likes.
To combat this, there are two data sources you should consider: your current posts and your competitor’s or industry’s posts.
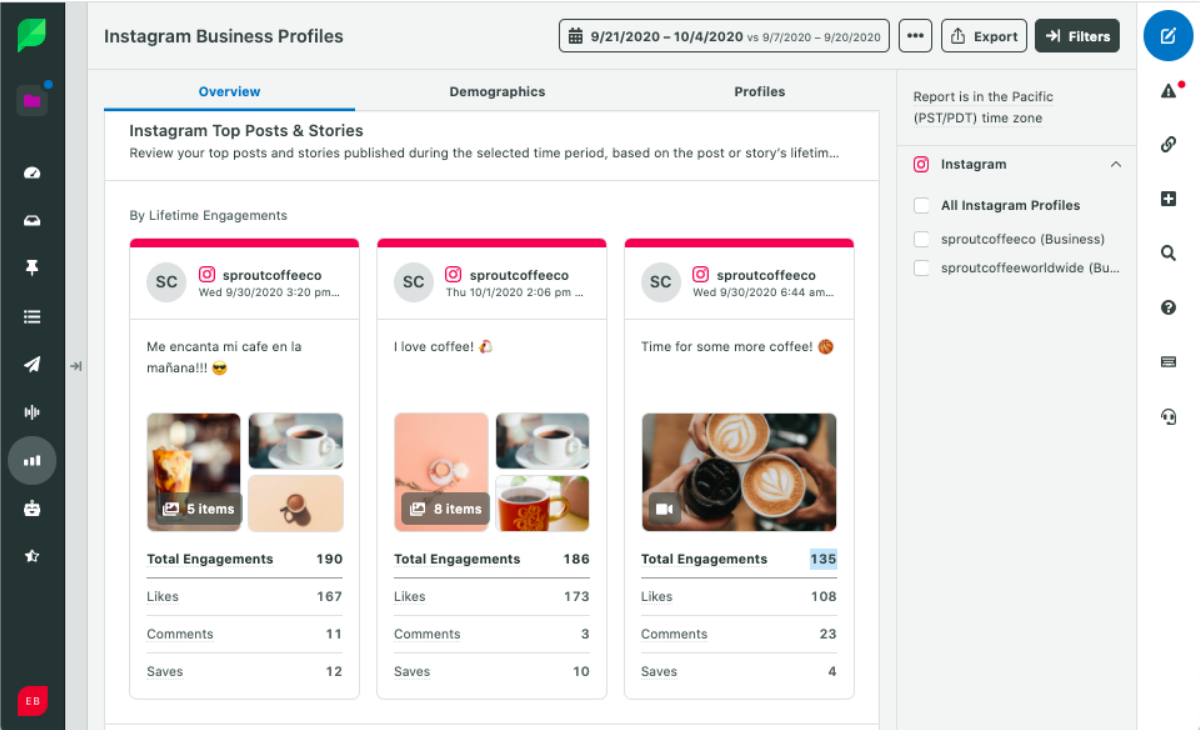

Use Sprout Social’s Instagram report or similar analytics to find the most engaging posts. See if there are any similarities between them. Were there people in the frame? Was natural light involved? Was it perfectly symmetrical? Now that you’ve looked at these photos, you’ll have a better idea of what resonates with your audience.
Write down some image notes and screenshot the best photos. This will serve as part of your brand identity guide. Keeping a cohesive identity on Instagram helps you stand out from the noise.
Next, use a competitor analysis tool to examine what your competitors and the rest of the industry are doing. What types of photos are being published and highly engaged with? Are they different from the ones you currently have?
Don’t be afraid to branch out from only photos, either. Graphics, text overlays and screenshots are all utilized by brands to add a more casual element to their accounts.
Once you’ve implemented some of the photography tips above, come back around to your Instagram account analytics. Check and see if the top posts have changed in type or if you’re seeing an overall lift in engagement with the incorporated tips.
There are always fresh ideas in the photography world so we’ll leave you with a final tip: follow inspiring brands and photographers. Mix your feed up so that you’re not constantly seeing the same types of posts that might propel you to set up similar shots. Ignore the herd mentality and begin to pave your own path in brand identity. Now go out and take some fresh photos!
37 free social media strategy templates that will elevate your workflows
Published on May 13, 2025 Reading time 14 minutes
Share