How to master Facebook ad targeting & zero-in on your audience


Written by Kayla Lee
Published on June 18, 2018
Reading time 10 minutes

With over 2 billion active users daily and an average use time of 35 minutes per user, it’s a top spot for B2C and B2B advertising. There’s never been a better time to be familiar with Facebook Ad targeting.
Facebook has hundreds of targeting and ad demographic options. To get the most out of your social media advertising dollars, you’ll need to zero-in on your audience.
In this article, we’ll explore how to get the most out of that money spent on mastering Facebook Ad targeting and zeroing-in on your target.
What is a Facebook Audience?
The “target” or “market” that you’re going to advertise to is called, “audience” on Facebook. You can target super specifically, like by the amount of education or income. Also targeting options include age, location, gender, job title and much more. The options are almost limitless. For real.
Let’s take a look at some examples.
For this GoPro ad, we might target photographers or people that love to hike or ski. Or we could use Pixel (more on Pixel below) to target users who have visited the GoPro purchase page but didn’t complete the purchase.


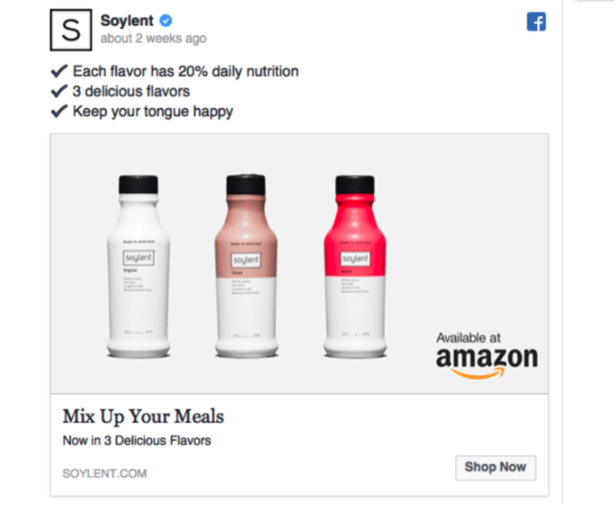
Or for this ad, Soylent might target vegans, people that like working out or moms that have recently liked their Facebook page or Instagram post.

The above examples are just a couple of the many hundreds of ways to target Facebook users. Let’s take a look at Facebook’s primary targeting methods:
Targeting on Facebook
Like we mentioned, there are literally hundreds of ways to target people. Keep in mind that you can use any combination of the targeting methods listed below.
-
- Location: You can target users by state, locality, zip code, country, etc. You can get more specific too, like targeting them where they work vs. where they live.
- Demographics: Demographics means data relating to a population, like age, sex, income, marital status, etc. Facebook offers a ton of demographic options.
- Interests: Interests are really helpful in defining a target market. Let’s say you’ve got an eCommerce store that sells R&B records, you could target users who have liked vintage record player pages, music pages, R&B artists, jazz pages, etc.
- Behaviors: Behaviors use the Facebook Pixel (discussed below) to target users. Pixel is a piece of code that tracks user behavior so that you can display ads to people that behave in certain ways. This is one of the most profitable ways to target, as for example, you might show ads to people who recently visited your website’s pricing page or subscribed to your blog.
- Engagement: Engagement is when someone comments, likes or follows you or your pages on social media. If someone has recently liked one of your Facebook or Instagram posts, you can have Facebook show them your ads.
- Partner Connections: This method of advertising shows ads based on behaviors users take off of Facebook. For example, if you’re a car dealership, you might target users who have recently applied for a new car loan.
- Automatic Optimization: Use the many demographic and target options above to zero-in on an audience that works for your company. Facebook will automatically optimize your audience for you.

Let’s say you set up an ad to target new parents that recently joined a gym in Richmond, VA.
Facebook might optimize that ad to reach more new moms vs. new dads because new moms tend to click-through more often. Once you’ve settled on a target that works well, you can use that target to build a successful Facebook Audience (a.k.a. target market). Just remember to save your audience to make future audience building easier.
Increase Conversions Dramatically With Facebook Pixel
Facebook Pixel is a unique code that you plug into the backend of your website. The code tracks user behavior on your site so you target web visitors based on their behaviors.
The goal of using the Pixel is to optimize your Facebook Ads and audiences based on user behavior and the data collected. Pixel allows you to do things like; Retargeting users who have abandoned a cart, who have recently viewed your pricing page or subscribed to a webinar.
Installing Pixel
First, you’ll need to create a Pixel for your site. Navigate to the Ads Manager, click All Tools > Pixels.
![]()

You’ll be prompted to set up your Pixel, agree to terms and name the Pixel. Then, you’ll install it on your site.
Select manually install Pixel.
![]()

To install the code, you simply copy and paste it into the header of your website.
![]()

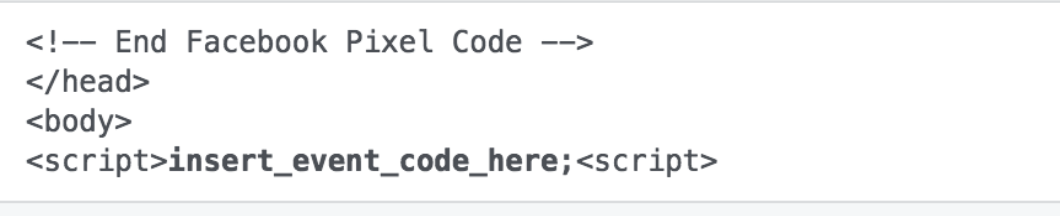
Find the <head> code in your website. Install the Pixel inside the header. It’ll look something like this when it’s in the right place:
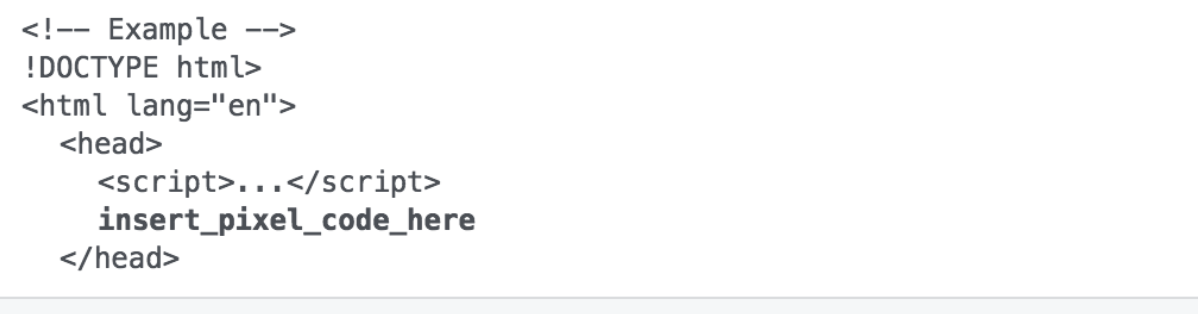

Make sure you save your website data with that code snippet in place!
Next, you’ll set up specific events you’d like to track. The behaviors that you will track are called Events. You tell Facebook what each of these Events is for your website.
For example, to track Lead Generation, you’d toggle the Lead Generation button, and copy/paste the code snippet into the <script> portion of the page on which you track leads (see screenshot below).
For example, you might track the confirmation or thank-you page for signing up for a webinar that you’re hosting, since those people are likely qualified leads.
Once you toggle Generate Lead to on, you can copy the code snippet and paste it into the <script> of the webinar confirmation page you want to track.
![]()

The <script> section where you want to paste this snippet looks like this:

How To Set Up Event Tracking For an Existing Pixel
If you’re already using Pixel and want to start tracking new Events, navigate to the Events Manager page > Pixels.

Next, click Details.


Then, click Set Up.
![]()

This will bring you back to the options for manually installing the code snippet. Click manually install and follow the steps above for installing the code.
![]()
How Do You Build a Successful Facebook Audience?
Building a Facebook audience takes some time since, for the best results, you want the audience to be specific, but not too specific.
The first step in creating a highly-specific audience is to get familiar with your customer persona. You can build out a customer avatar to help you set up successful Facebook Audiences.
Here is an example of a good customer avatar. Notice how specific it is.
![]()

Additionally, there are three types of Facebook audiences. Each type has its advantages, so let’s take a look:
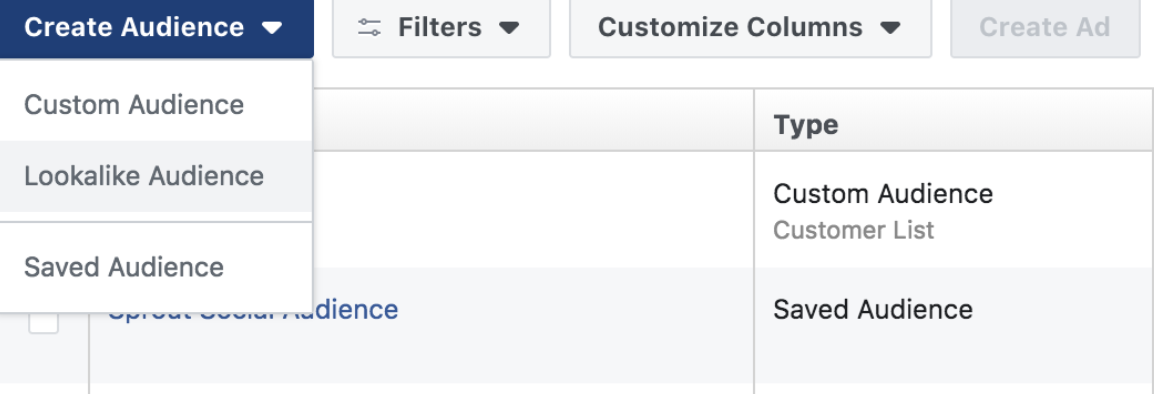
1. Facebook Saved Audiences
A Facebook saved audience is what it sounds like; an audience you can create, save and use again in later campaigns. If you know your target market demographics well, you can use that info to create an audience to reuse in many of your campaigns.
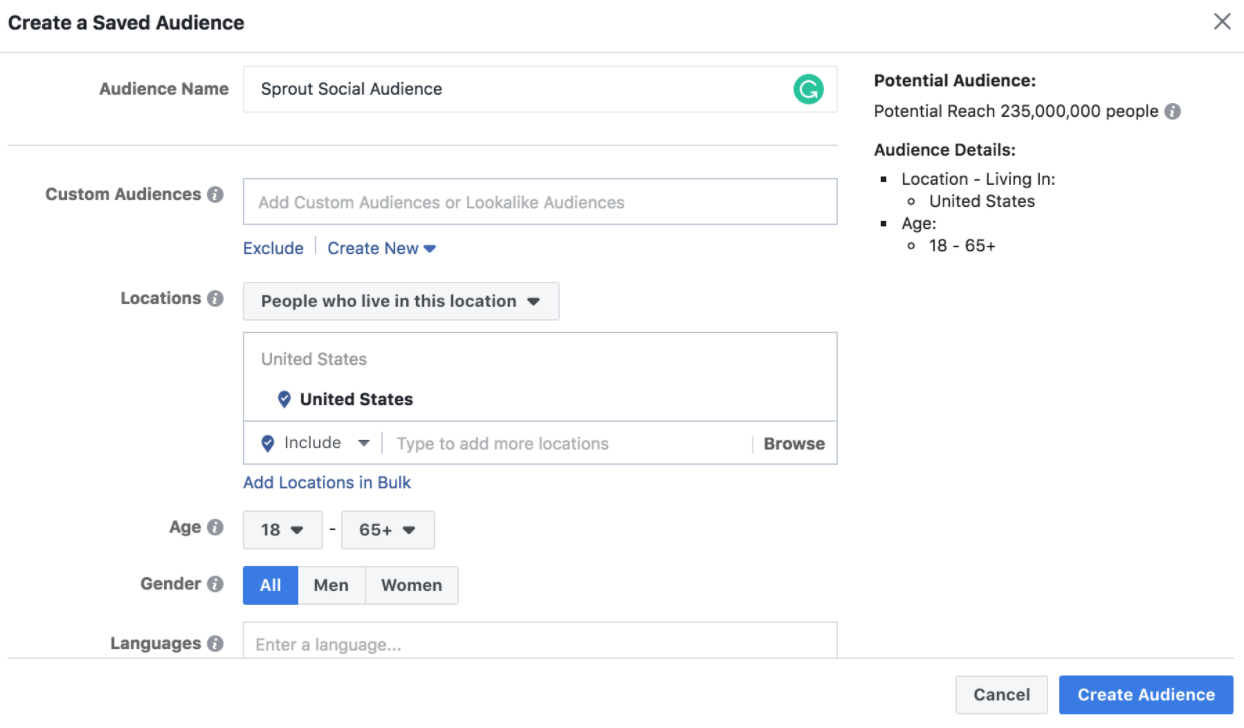
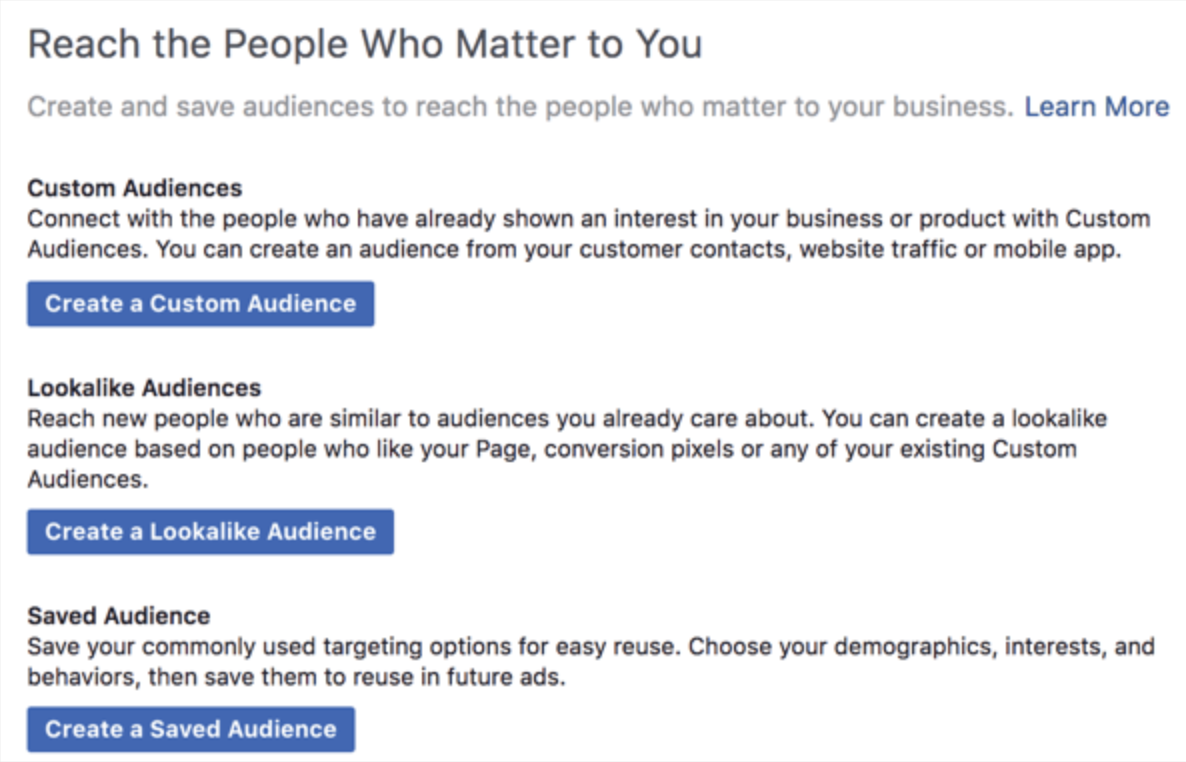
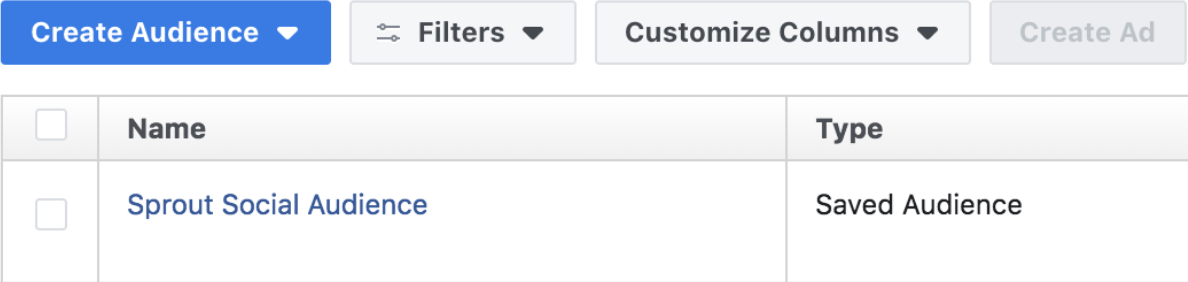
To set up a saved audience, navigate to the Audiences page. Then, click Create a Saved Audience. If this is your first time using Facebook Ads, it’ll look like this:

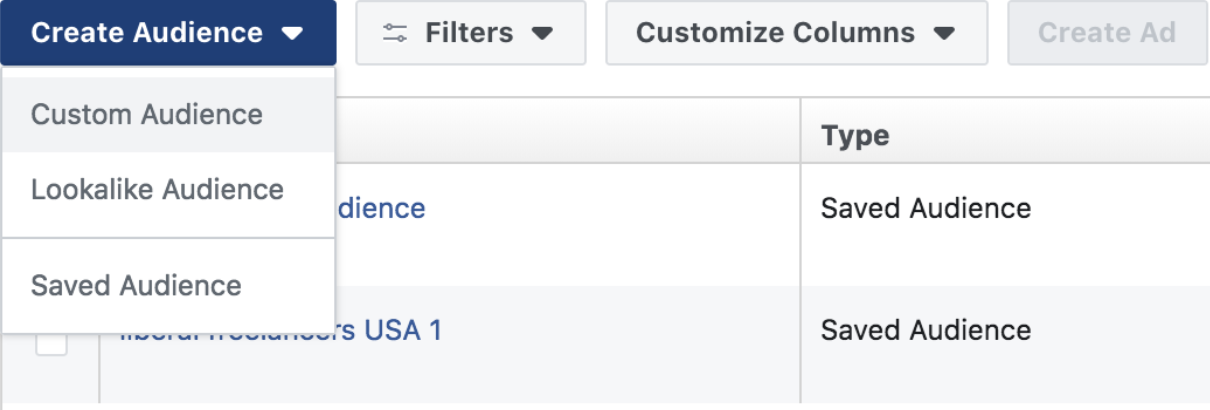
If you’ve used Facebook Ads before, navigate to the same Audiences page, then click Create Audience > Saved Audience.

Next, you’ll see the Facebook Ads Manager audience creation page. This is where you can plug in those useful demographics you discovered during the process of mapping out your customer persona.
When you’re all set with your demographics, location, interests, etc., click Create Audience.
This saved audience will now appear on your Audiences page.

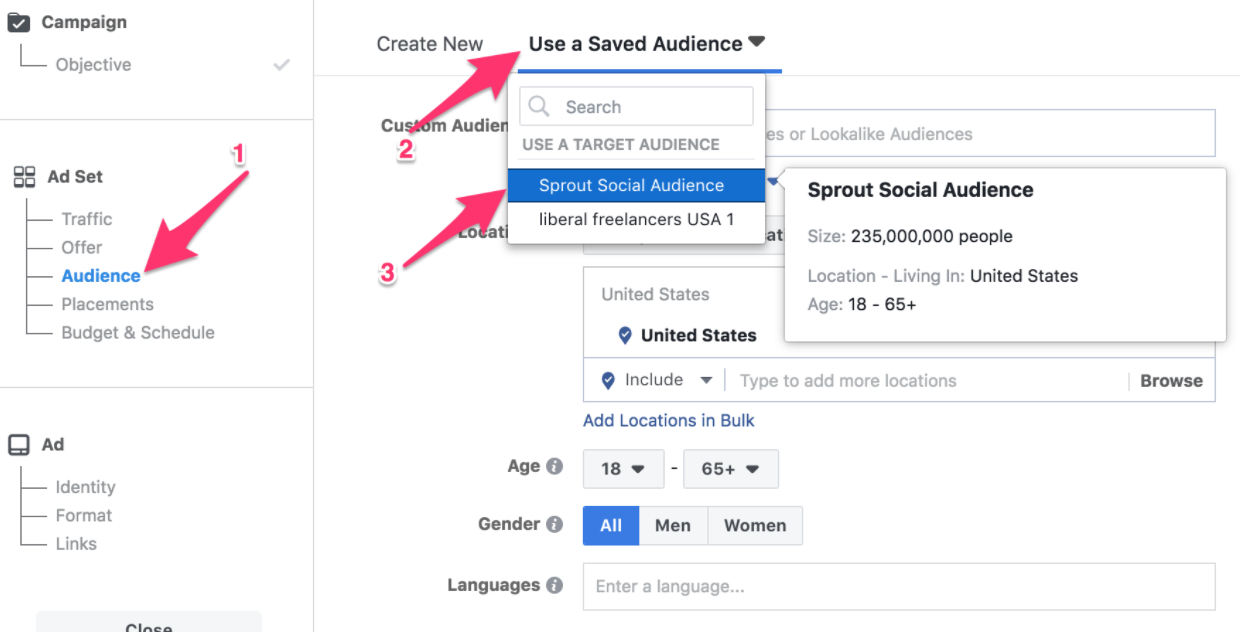
When you want to use this saved audience in future campaigns, navigate to the Audience tab on the left side. Then, click on Use a Saved Audience and select the audience you’d like to use.

2. Facebook Custom Audiences
Custom audiences are some of the highest converting. Upload a list of emails or phone numbers of the prospects you want to show ads to. You can also have Facebook exclude emails or numbers on that list, let’s say if you know those folks aren’t interested in your product or service.
Custom audiences also work with the Pixel, to help you show ads to folks that have visited your website, or taken another action online, such as viewing your pricing page.
Let’s say you sell a SaaS product for lawyers. And you want to create a Custom Audience and use a list of emails you’ve collected of local attorneys.
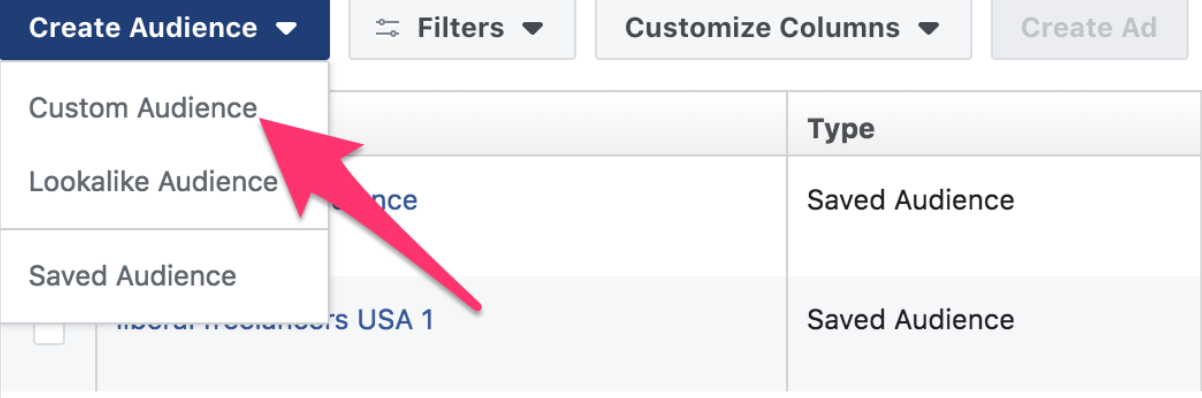
To create a custom audience, navigate to the Audience page, then click Create Audience > Create Custom Audience:

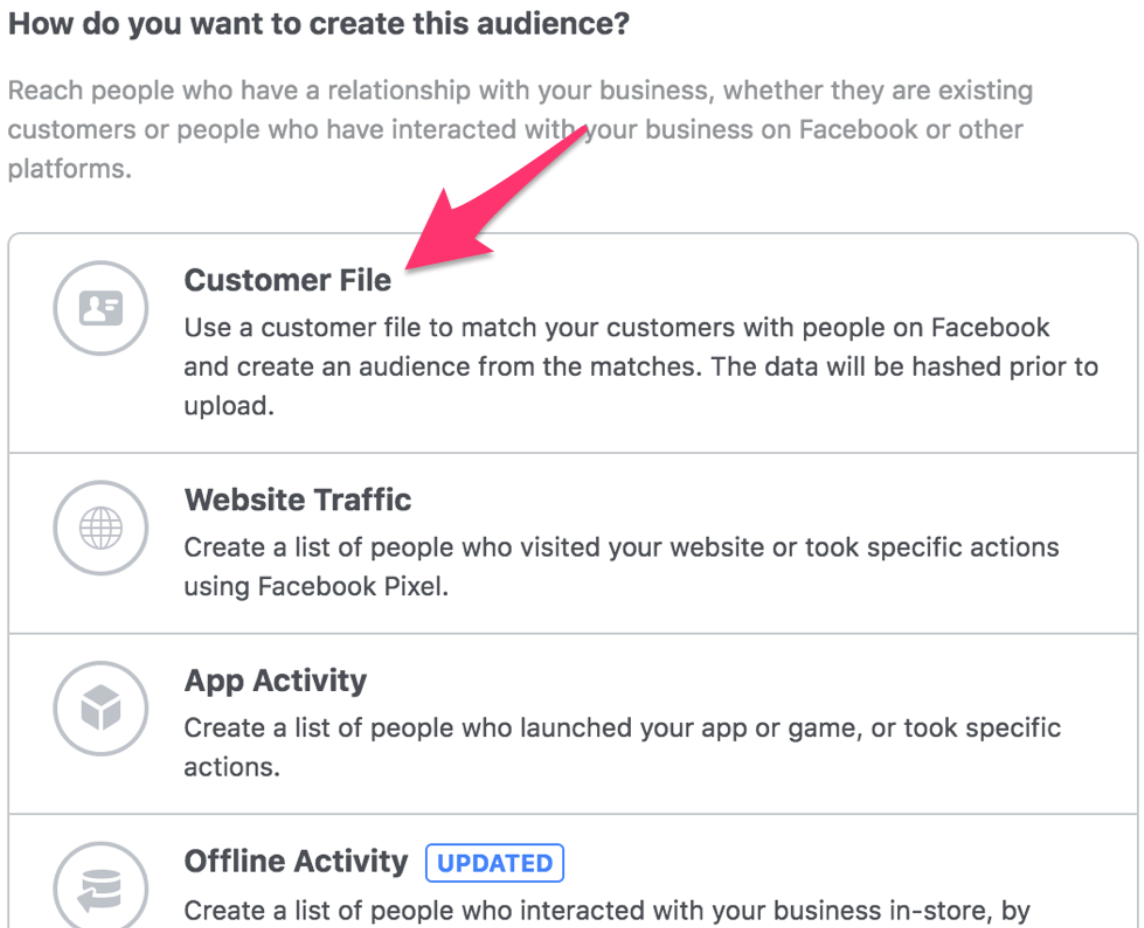
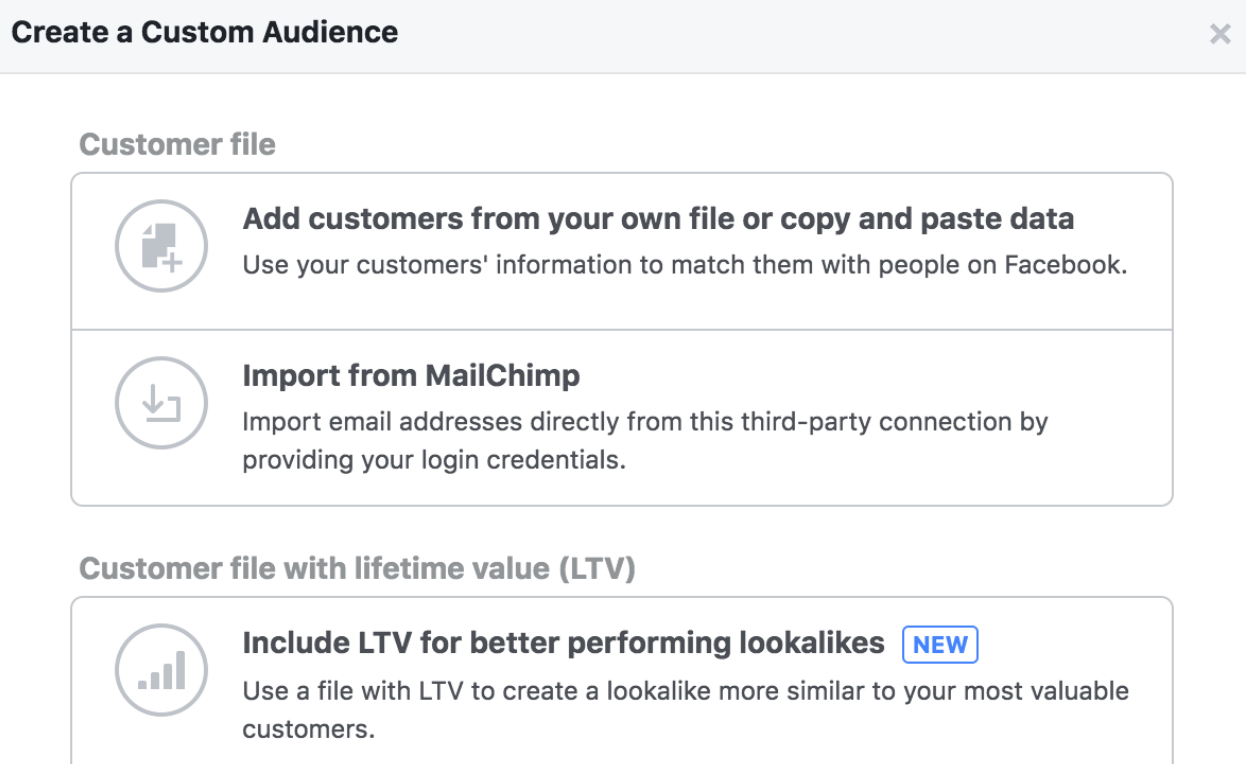
Next, you’ll see this page with Custom Audience options. To use a list of emails or numbers, you’ll want to choose Customer File.

Afterward, you’ll have the option of uploading data from a file of your own or from MailChimp.

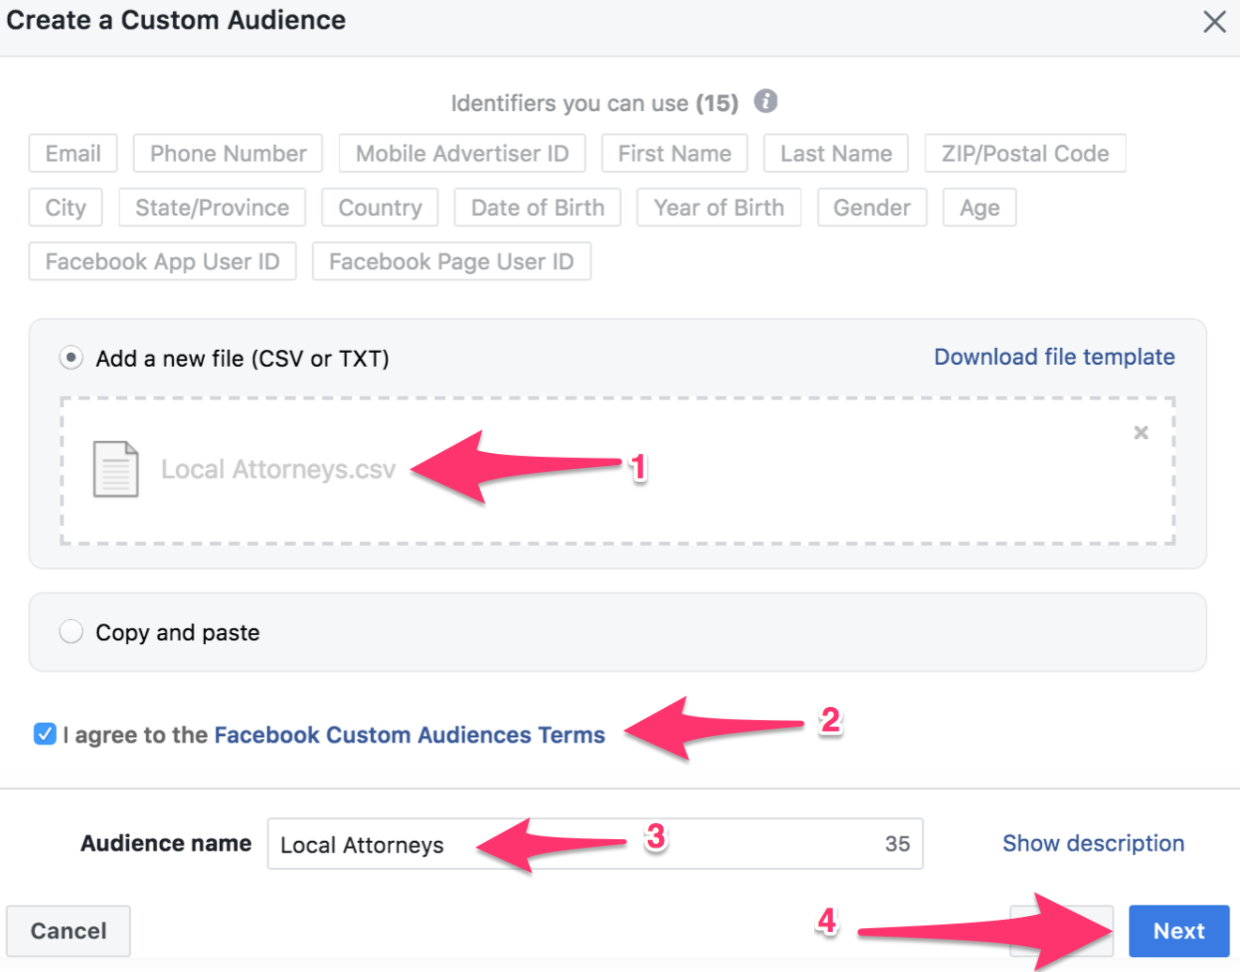
If you are going to use your own file, make sure it’s a .CSV file or .TXT file. Check out Facebook’s best practices for uploading files.
After you upload the data, you’ll need to agree to Facebook’s terms and then name the audience. Click Next.

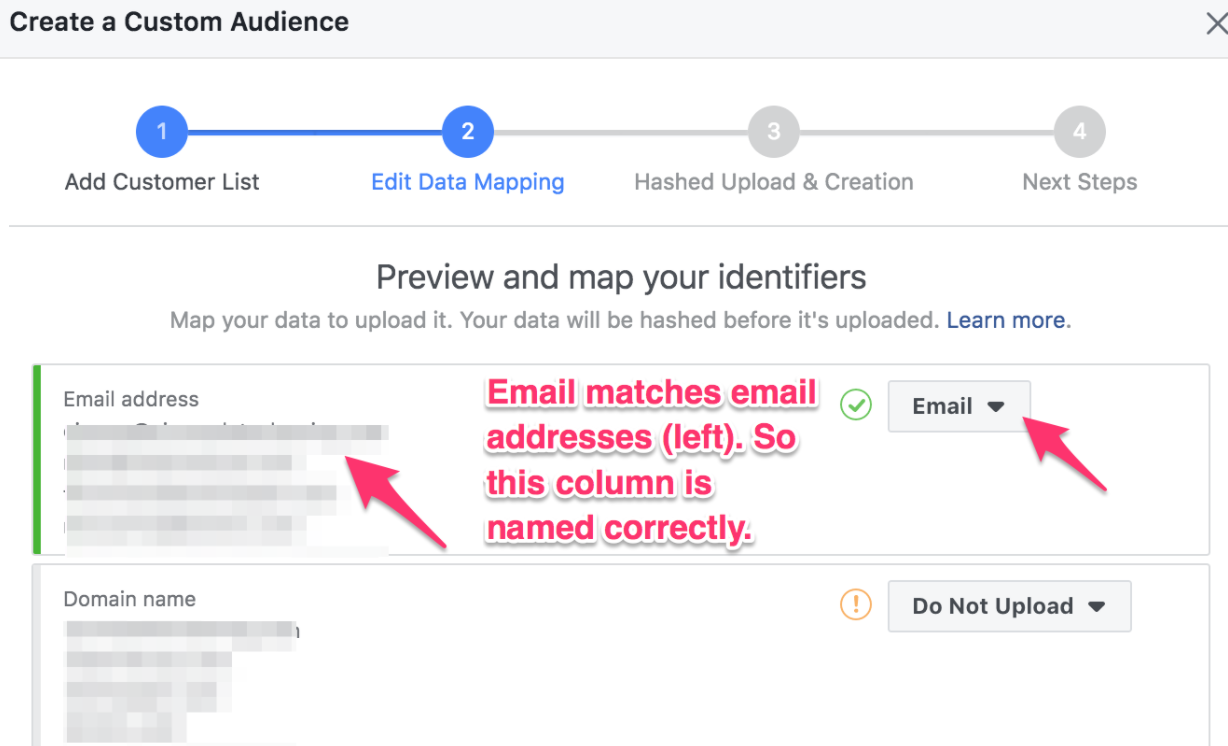
You’ll see a preview of how Facebook has classified your data. Make sure that Email matches up with your email addresses. Phone with phone numbers, etc. If the data don’t match the names automatically given by Facebook, just click the name to change it.

This Custom Audience will now appear in your Audience list. It’ll say “Updating Audience,” in the Availability column while all the data is uploaded. Once it’s ready to use, you’ll get a notification from Facebook.


Just like all Facebook audiences, the more specific (without being too specific) your Custom Audience is, the better your results will be.

3. Facebook Lookalike Audiences
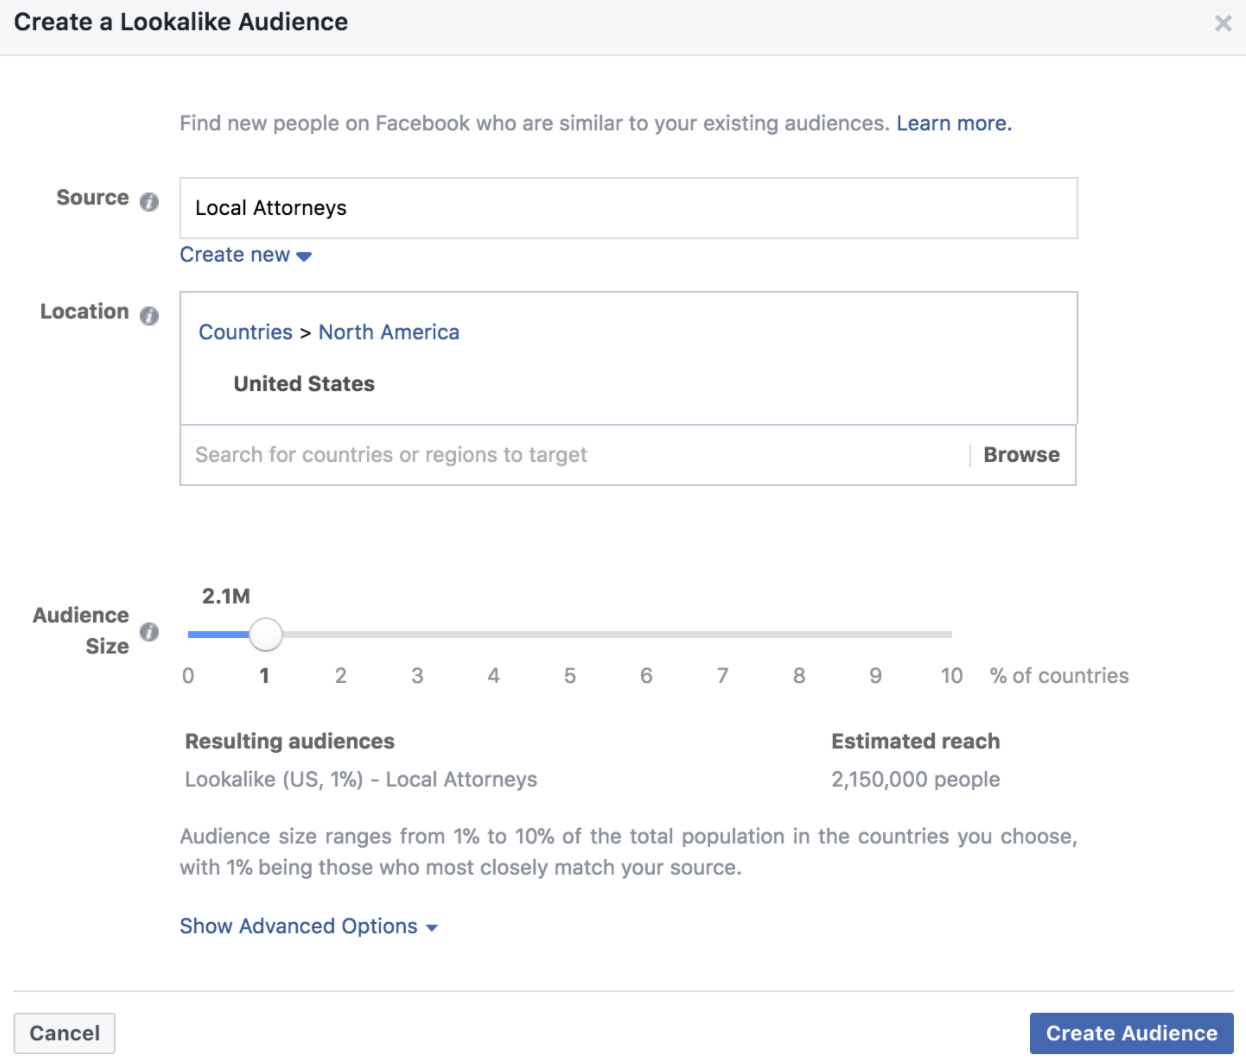
After you’ve created a few valuable Custom Audiences, you can start using the Lookalike Audience option to target users that are similar to the target you’ve defined in your Custom Audience.
Let’s say you wanted to continue targeting attorneys to sell your Lawyer SaaS tool. You could use Lookalike Audiences to target more attorneys in another state. Or even attorneys that weren’t in your email list that Facebook’s algorithms will find based on other criteria.
Navigate to the Audiences page. The, select Create Audience > Lookalike Audience

Next, you’ll have the option to choose which Custom or Saved Audience you want to base your new lookalike audience on.
Once you’ve selected the audience on which to base your new Lookalike Audience, adjust the settings for Location and Size, then click Create Audience at the bottom right.

Facebook Ad Targeting Best Practices
Custom Audiences gives advertisers tons of options for enhancing ad results as there’s so much that can be done targeting Website Traffic and Events. Custom Audiences is a great way to retarget people that have already visited your site, making your ad dollars go further.
The average click-through rate of a normal display ad is about .07%, while a retargeted ad averages a click-through rate of .7%. So, users are about 164% more likely to click your retargeted ad than a non-retargeted one.
This section explores a few of our favorite ways to retarget website visitors and people familiar with your online presence.
Target Visitors Who Didn’t Complete a Purchase
To show your ads to people who visited a product page on your website, but did not complete a purchase, you can use Pixel’s website traffic events.
The way it works is that you create an event attached to the product page URL. Then, you’d exclude any other URLs, like the Thank You or Completed Purchase page.
First, click Create a Custom Audience from the Events Manager page.

Then, select People who visited specific webpage from the drop-down.
![]()

Decide how recent the viewers should be for your ad, then enter that number into the days box. Next, enter your product page URL.
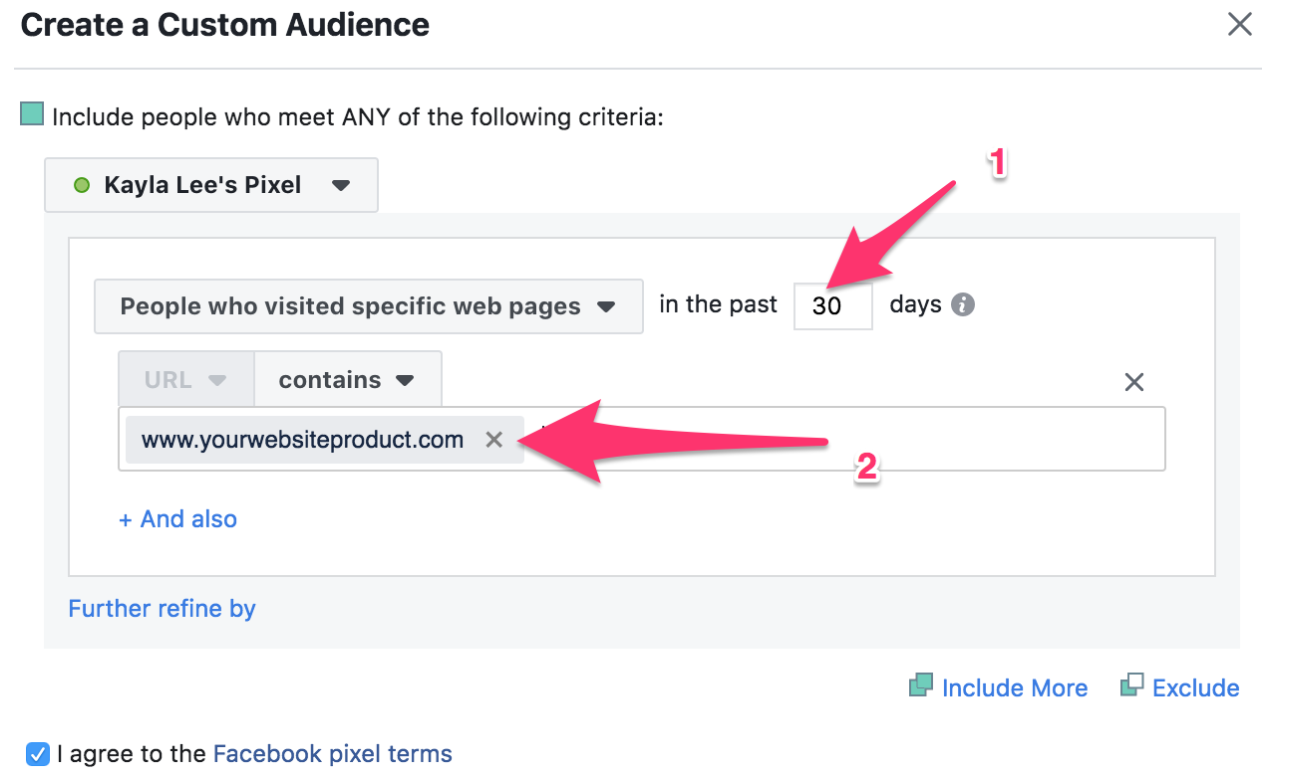

If you click on Further refine by, right beneath the URL box, refine users by device and frequency as well.
The following setup would advertise to people who have visited www.yourwebsiteproduct.com, at least two times in the last 30 days from their iPhone or iPad.
![]()

When you’ve got your product page URL set and have refined it, you’re ready to set up the URLs you’d like to exclude.
This step is important because it tells Facebook that anyone who has gone on and completed a purchase (or any other event you want to exclude) will be excluded from this campaign. To do this, we simply want to exclude people who have seen the purchase confirmation page.
Note* If you have an eCommerce store, then you will have the option to simply exclude “Purchases.”
Change the button next to URL to Equals. This is because we want to exclude this exact URL.
Then name your audience and click Create Audience.
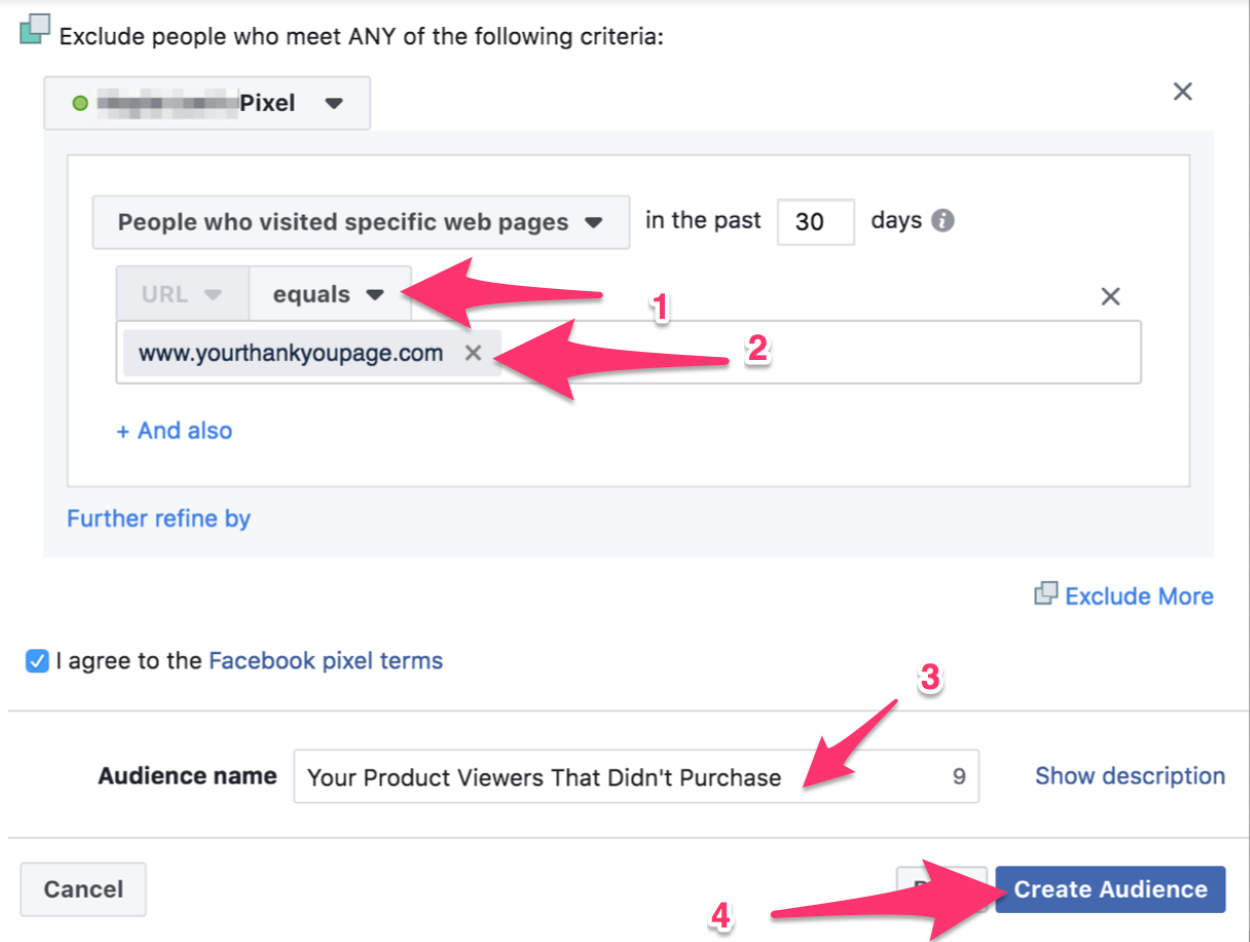

Note* If you want to exclude only people that have purchased certain products, then you’d only include that specific product page and therefore, you would enter that product’s specific confirmation page into the excluded text box (No. 2 above).
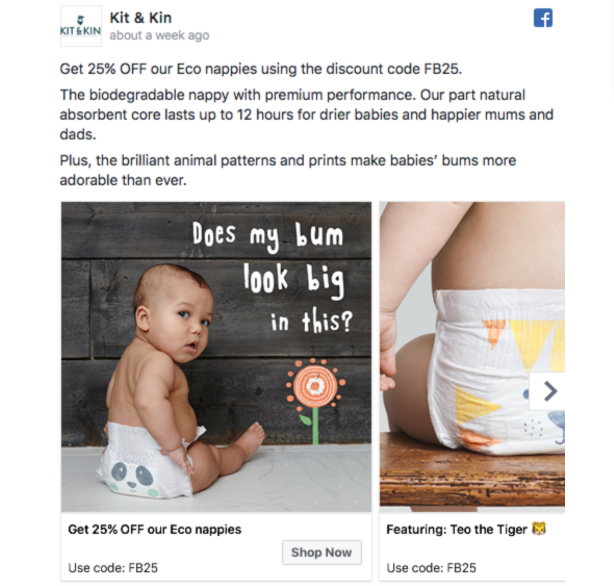
To get the most out of a product retargeting ad, you want the ad copy to be brief, maybe you’ll even apply a discount to the product ad. Like this one:

Retargeting Visitors That Read Your Blog
As blog readers are much more familiar with your brand than someone that’s never heard of your company, you can bet that targeting your blog readers gets you more bang for your Facebook Ad buck.
This is great for low-touch SaaS companies or any company that sees decent conversion rates from their blog. You can show a product in your ad or even advertise another blog post or an eBook.
First, get to navigate back to the Pixel page > Create Custom Audience (see above).
Next, make sure that you set the URL to contains. We want to make sure that any URL with the word blog in the address is added to the group that we advertise to. So enter blog as a keyword in the space.
This setting will show your ad to anyone that views a page with the word blog in the URL. Example: yourwebsite.com/blog/article123 or blog.yourwebsite.com.
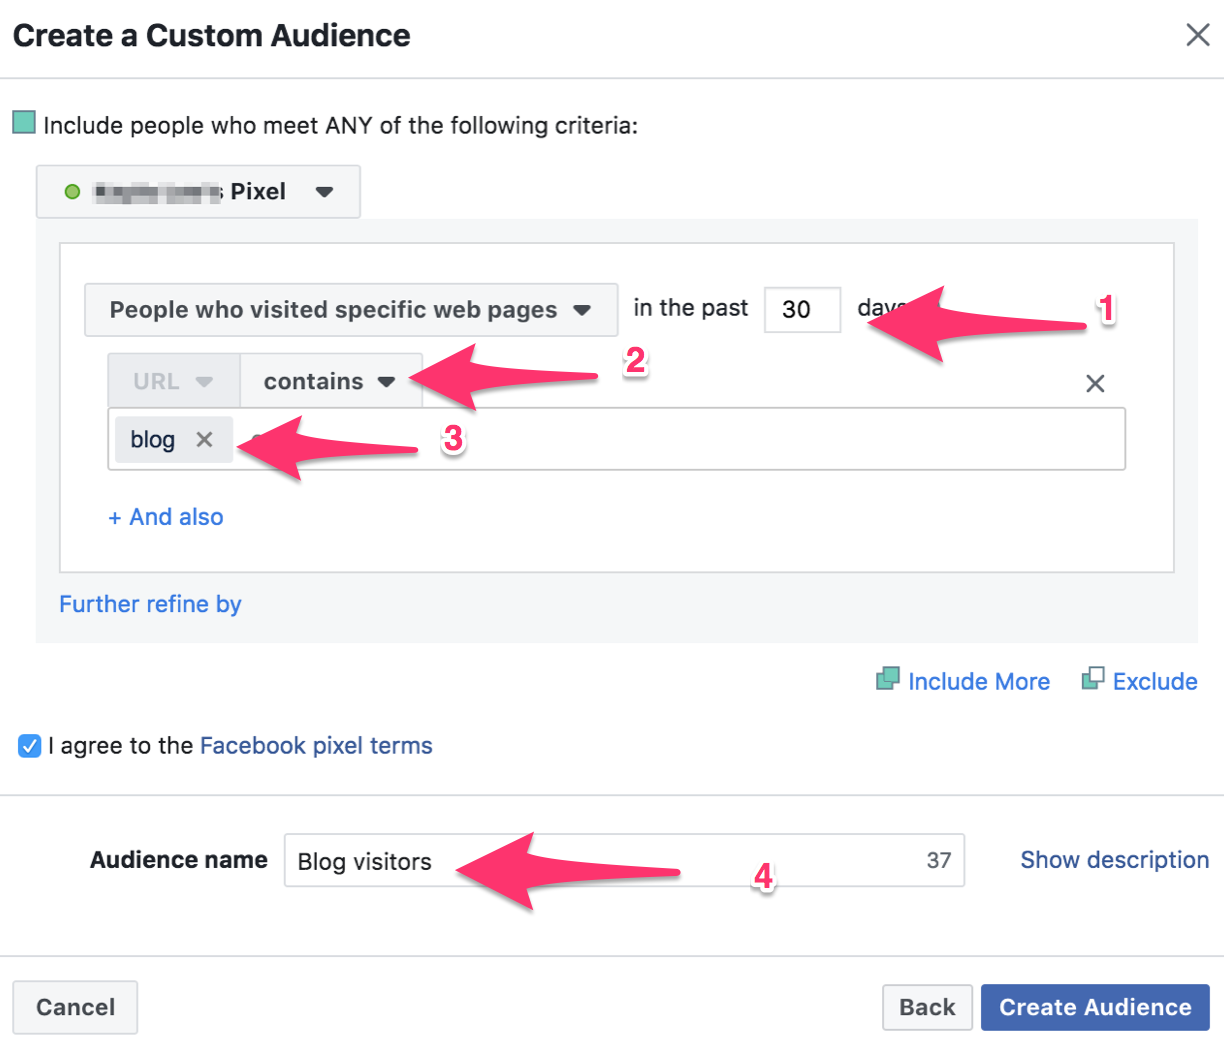

When you’re finished, click Create Audience and Facebook will save the audience to your audience list.
You can use these two different tactics for a number of scenarios:
- Target anyone that’s visited your website.
- To target people who have visited 2 or 3 specific pages on your site, like several products.
- Target people who viewed a landing page, but didn’t opt-in to the list or offering.
Optimize your Facebook ad reach
Now that you know the essentials of Facebook ad targeting, make sure your content and strategy are also up to par. Check out these resources for your next steps in designing a great Facebook ad campaign from start to finish:
- How to foolproof your Facebook advertising strategy
- Facebook advertising cost: Everything you need to optimize your ROI
- Facebook Lookalike Audiences: How to optimize ads to reach new customers
- A step-by-step guide on how to use Facebook Business Manager
- 5 brilliant Facebook campaigns (& why they worked)
- 12 Facebook Ad Examples You Wish You Made
Share