
September 15, 2015
Set Publishing Permissions for Users Who Require Approval And Those Who Can Approve
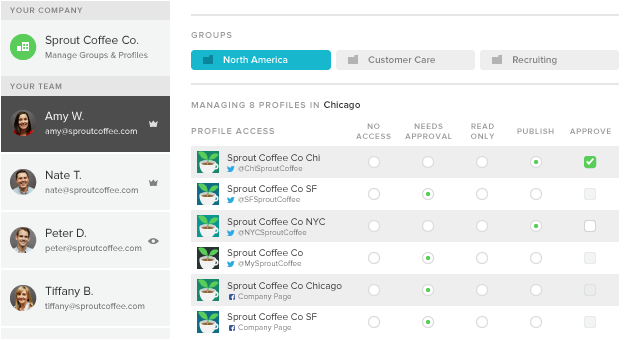
Sprout’s advanced publishing permissions (available in Professional and Advanced plans) now include Needs Approval and Approve. Both additions are user-based permissions that are set on the profile level to help facilitate the new message approval workflow.
- How To:
- Select Users & Social Profiles from the gear menu to configure user-based permissions for each profile.
- Select a user on the left and grant the appropriate profile publishing access.
- Needs Approval (formerly Draft) requires team members to submit messages before they get added to Scheduled or Sprout Queue.
- Approve enables a user to approve or reject submitted messages and can only be granted to a user with Read-Only or Publish.
- Click Save.
Submit A Message for Approval from Compose
Sprout users in Professional and Advanced plans can now submit a message for approval directly from the Compose window. Messages can be submitted as a basic draft; alternatively, users can apply a queue priority (first/last) or set one or multiple post times via the scheduler before submitting for approval.
- How To:
- Open the Compose window.
- Click the approver icon to open the Choose Approver menu.*
- The Choose Approver menu will dynamically display only users with Approve permission for all the profiles selected in the picker.
- Choose the approver and the icon will turn blue.
- Compose your message.
- Select a message type: Draft, Queue or Scheduled.
- If Queue or Scheduled, select a queue priority (first/last) or set one or multiple post times.
- Click the green Submit for Approval button.

*Note: The approver icon will initially appear red for a user with Needs Approval on any profile selected in the picker as this user is required to submit the message for approval. If a user has Publish on all the profiles selected in the picker, the approver icon will appear gray as they are not required to submit the message for approval but can choose to do so.
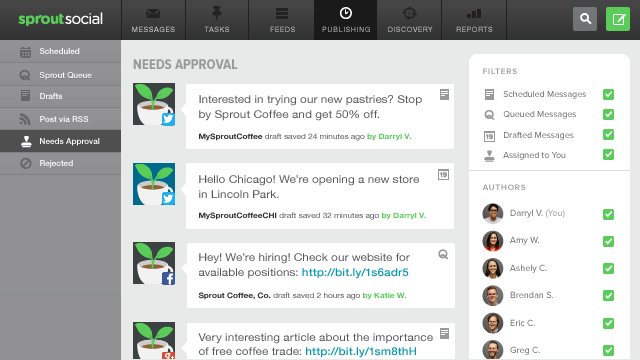
View And Take Action On the Messages Submitted for Approval
The new Needs Approval section under Publishing provides a centralized place for both the author/submitter of a message and all potential approvers (including the assigned approver) to review submitted messages.
- How To:
- Visit Publishing > Needs Approval to review submitted messages.
- Submitter: Users can view any message they have submitted for approval.
- Submitter: Click the corresponding icons on the message surface to Edit or Delete the message.
- Approver: Within Needs Approval, any user with Approve permission on a profile can view and take action on submitted messages for that profile—even the ones not directly assigned to them.
- Approver: Use the Assigned to You filter to easily find the messages specifically assigned to you.
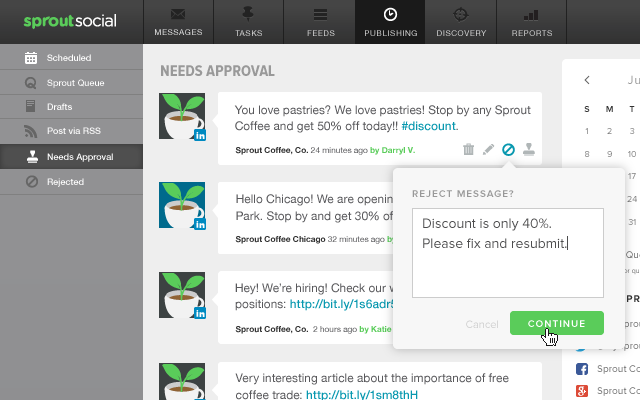
Approve or Reject Messages from Needs Approval
Any user with Approve permission on a profile can approve or reject a submitted message for that profile—even the ones not directly assigned to them. That way, if the assigned approver is unavailable, another user with Approve permission can easily attend to the messages pending approval. If a message is rejected, the approver has the option to include a note to provide valuable feedback and context as to why the message was rejected.
- How To:
- Visit Publishing > Needs Approval to review submitted messages.
- If desired, use the Assigned to You filter to easily find the messages specifically assigned to you.
- To Approve a Scheduled or Queued Message:
- Click the Approve button and the message will automatically move to Scheduled or Sprout Queue respectively.
- To Approve a Draft:
- Click the Approve button and the message will open up in Compose.
- Change the message type to Queue or Scheduled and assign a queue priority (first/last) or set one or more post times. This step is required.
- Click the Approve button and the message will automatically move to Scheduled or Sprout Queue respectively.

- To Reject a Message:
- Click the Reject button.
- Add a note (optional).
- Click Continue and the message will move to the Rejected section.
- Submitter will receive an email—including the optional note—to notify of the rejection.
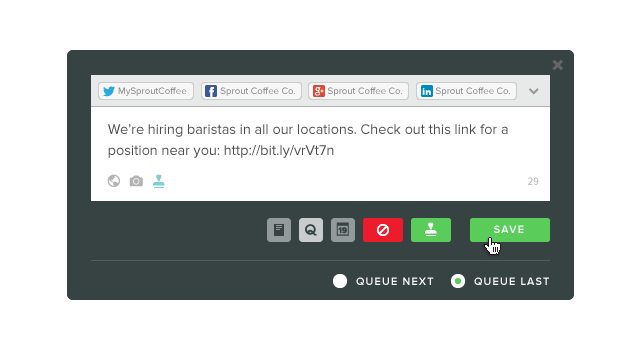
Edit a Message Before Approving It
In addition to the options to approve or reject a message, approvers can also choose to edit a message before approving it.
- How To:
- Visit Publishing > Needs Approval to review submitted messages.
- Click the Edit icon and the message will open up in Compose.
- Edit the text, image attachment or targeting options in the message.*
- Click Save to return the message to Needs Approval with edits in place.
- Click Approve to approve the message with edits in place.
*Note: When editing a message submitted for approval you cannot change the profiles in the picker, the assigned approver or switch between a Queued or Scheduled message.
Share